Set up
Last updated February 24th 2025
The success of your Pmax campaign relies on the right setup, and the right setup will depend on the structure of your business.
In the following we will go through guiding principles for campaign setup, with emphasis on constraints — one of the most critical factors in achieving strong performance with Pmax.
#New customer acquisition
New customer acquisition contains two options: bid higher for new customers or only bid for new customers. This feature is off by default, and it might be better to leave it this way.
While turning it on most likely will show an uptick in new customers, cross checking the data with your own customer records may reveal that many of those ‘new customers’ already exist in your database.
It’s worth noting that bidding for new customers is not the same as bidding for cold traffic. When you ask Google to target new customer acquisition, the algorithm will seek out warmer traffic more likely to convert.
For many advertisers, the majority of new customers come through branded traffic. Instead of letting Google control customer acquisition, investing more budget in brand campaigns could potentially provide better value for your money.
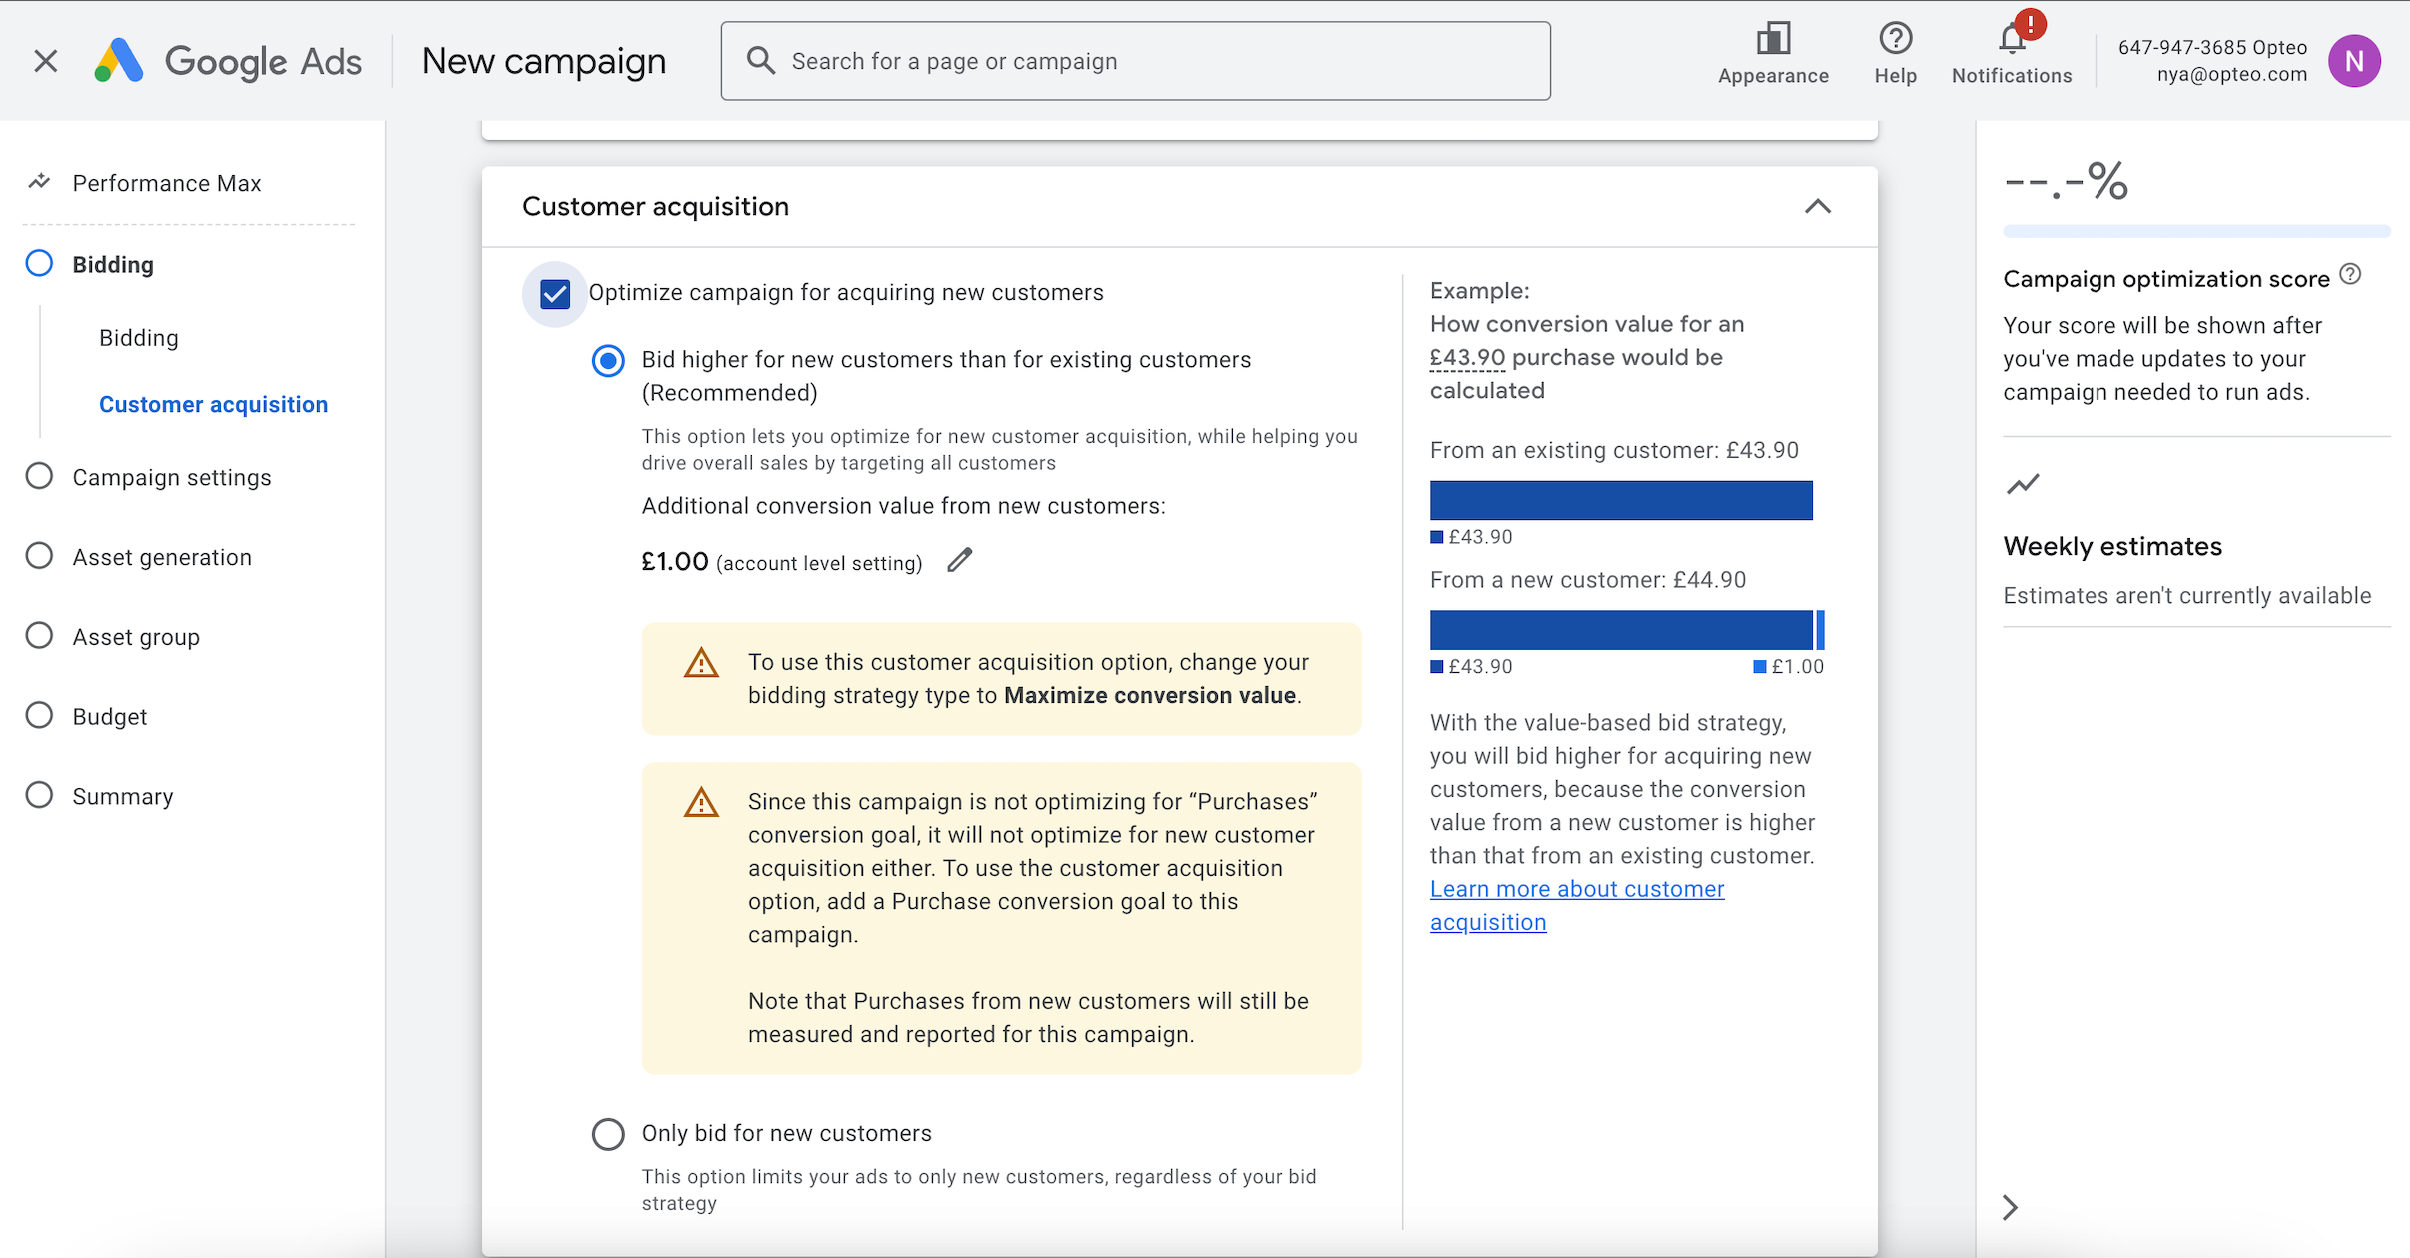 Bidding > Customer acquisition
#AI generated assets
During the set up of your campaign, you’ll have the option to add AI generated assets to your campaign. The asset types you can generate with AI are: headlines, long headlines, and images (beta).
The AI generated text assets are not yet at a quality were it’s recommendable to use them out of the box. Instead, the feature is useful to brain storm with, and you’ll get better results by writing your own (or at least amending the auto generated ones).
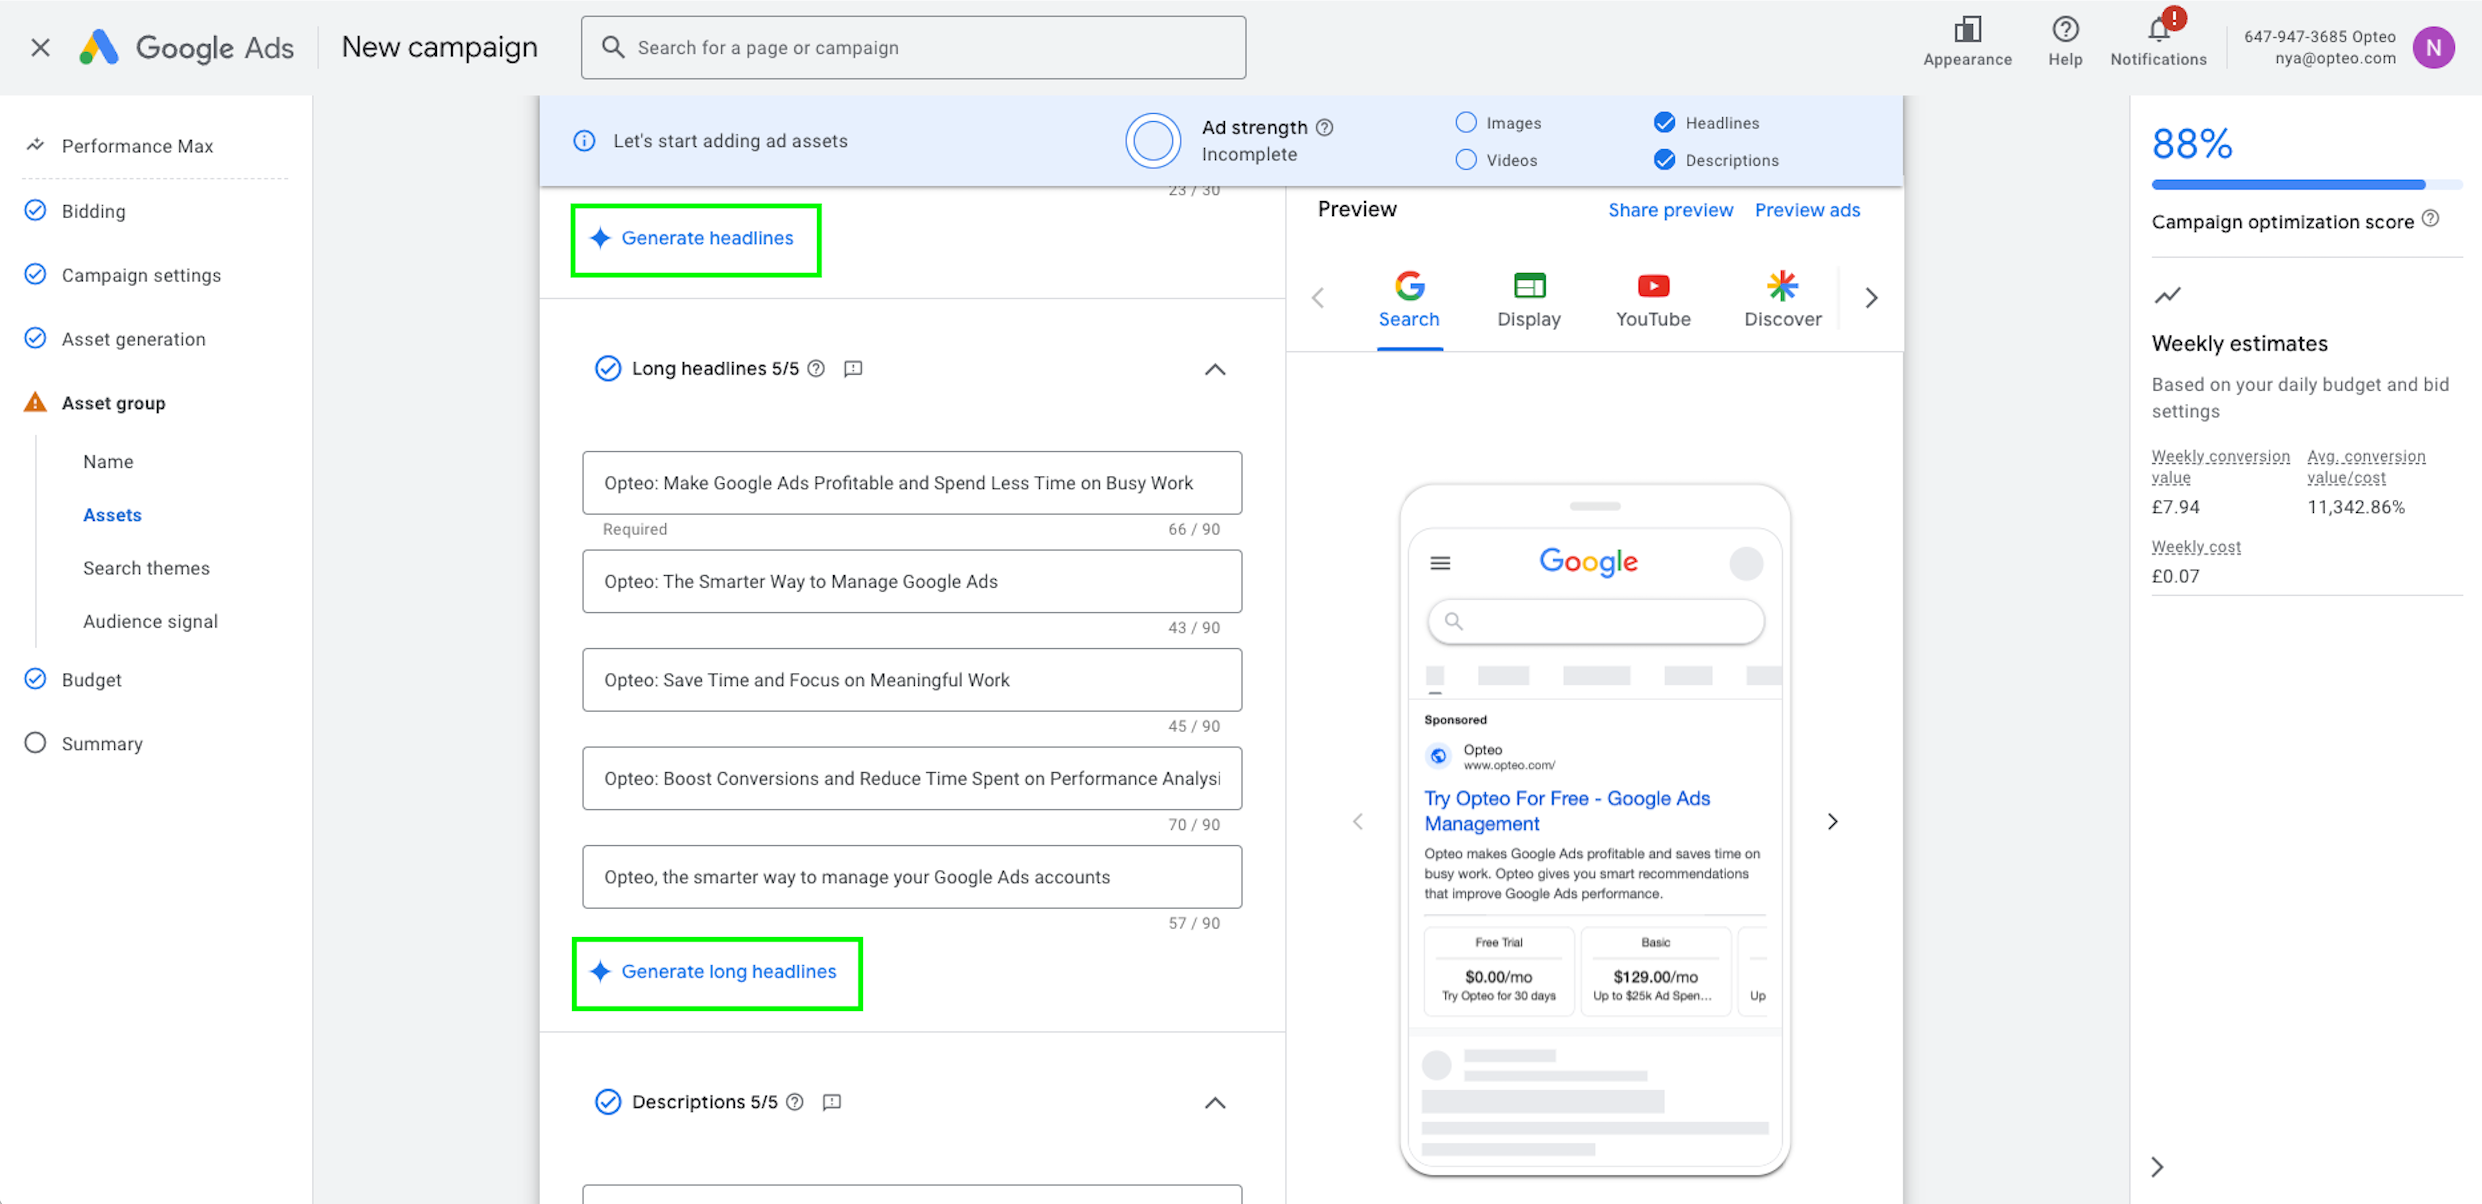 Asset groups > Assets
Google also has the option to auto-generate images. You can choose an aspect ratio, and then simply generate an image by writing a prompt. It churns out high quality images, but it does have some serious limitations:
- The image generator will not create images with branded visuals, and prompts containing brand names will throw an error and not generate an image.
- The image generator will not generate images with faces in them.
These two points create limitations on the usefulness of the images generated here. However, the image generator can still be used for simple edits, such as changing background colours or making other minor adjustments.
Remember that Pmax is only as good as what you put into it, including its assets. With this in mind, it’s worth investing time and resources into creating strong ad creatives.
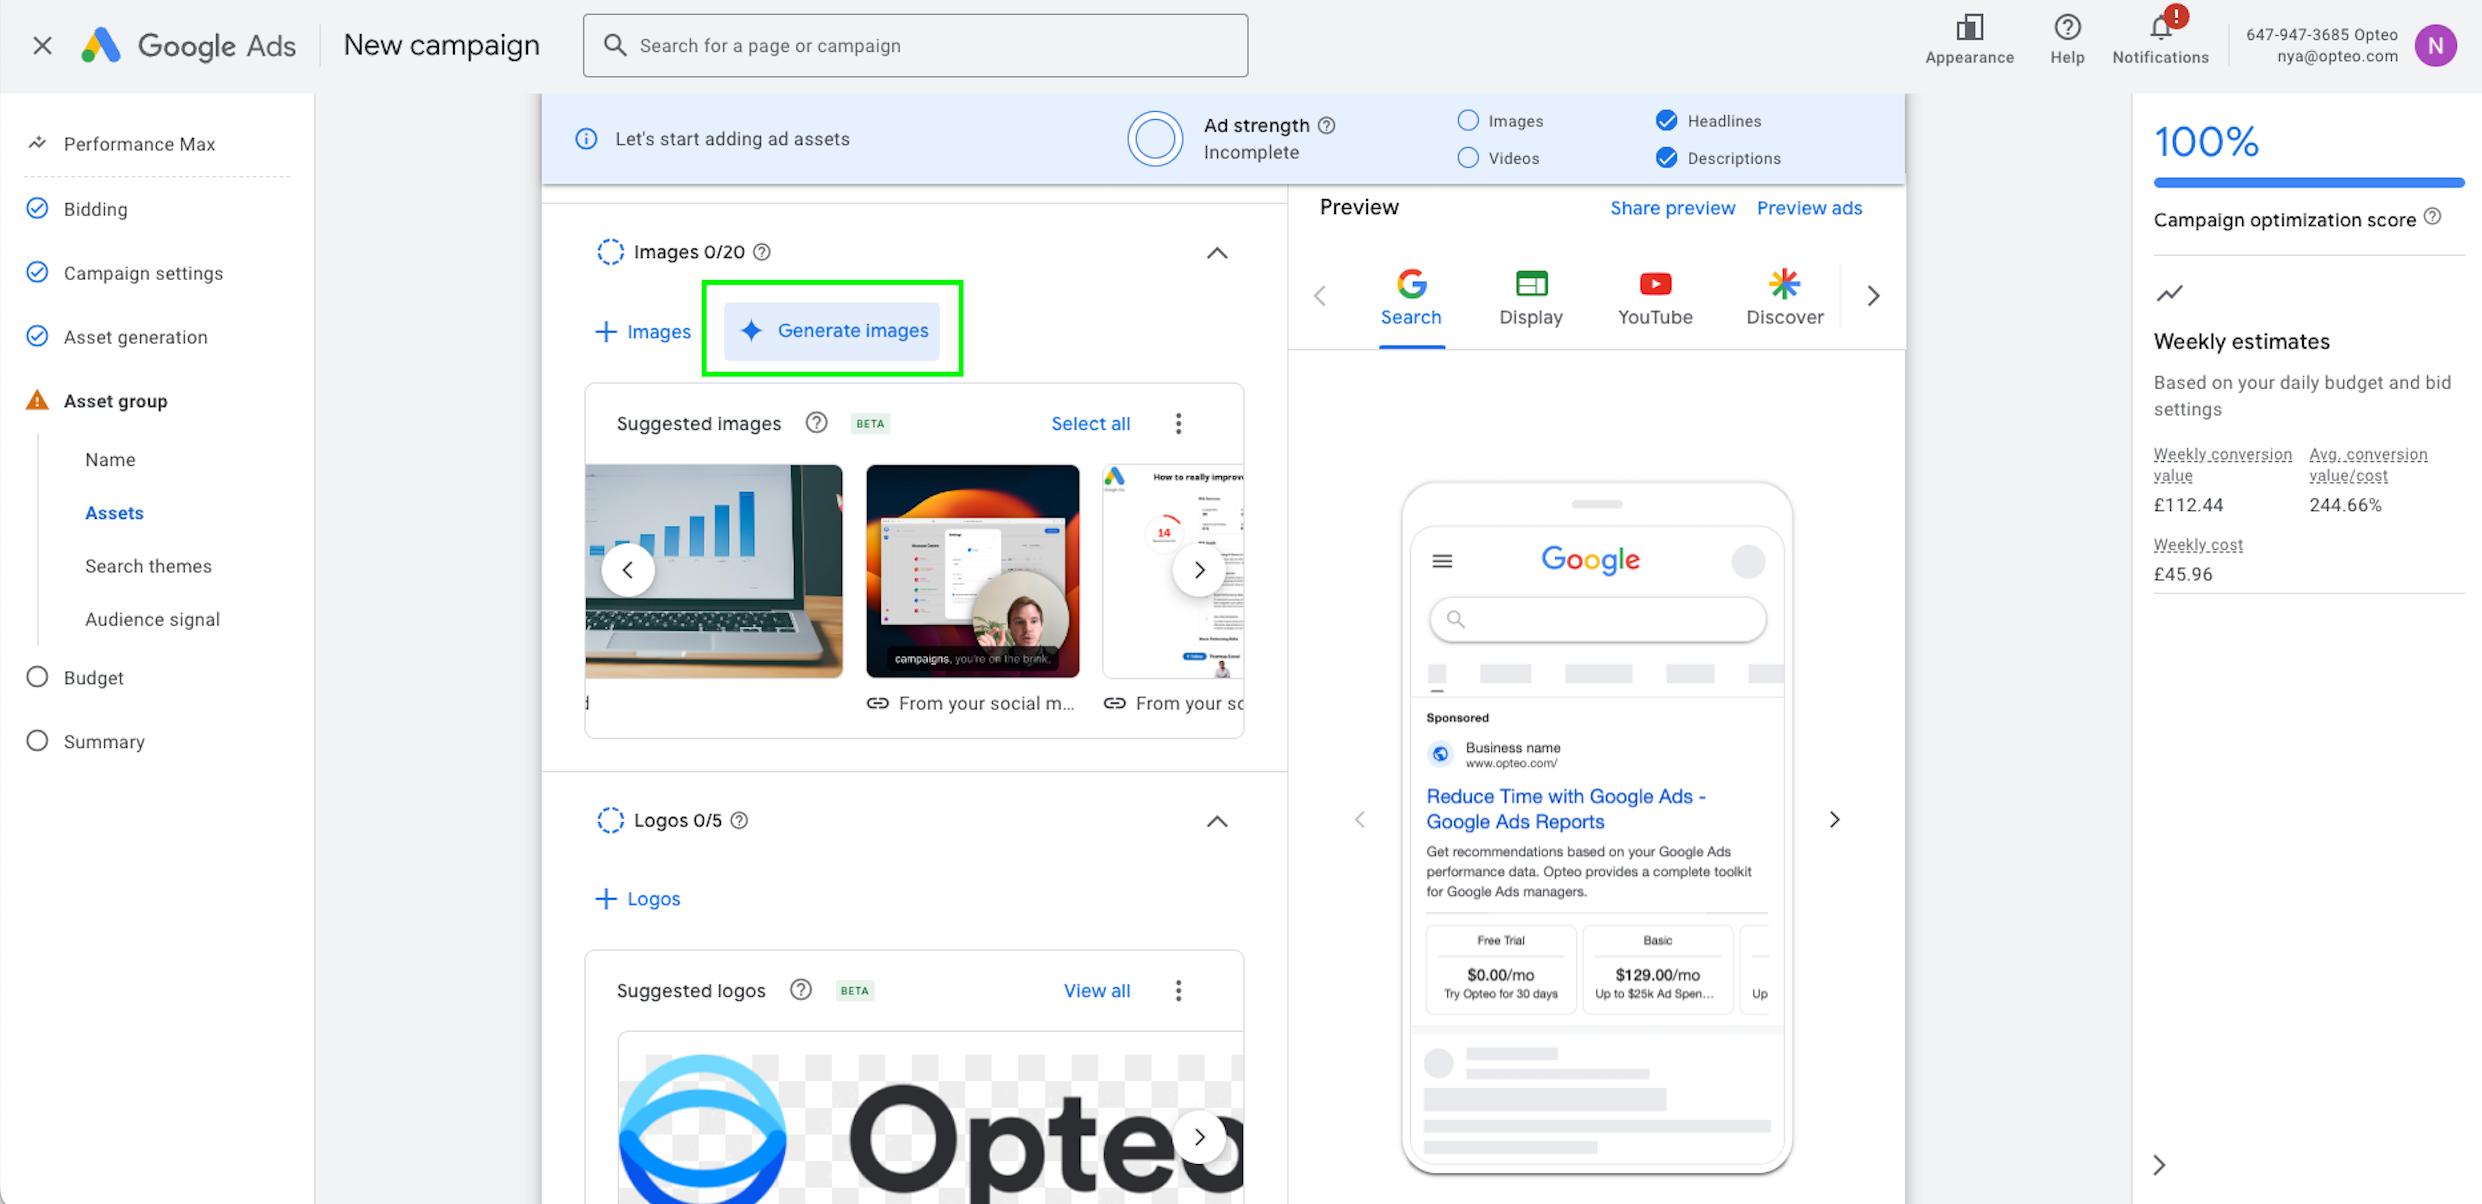 During campaign setup, you can click “generate images” to open up the image generator and image editor.
 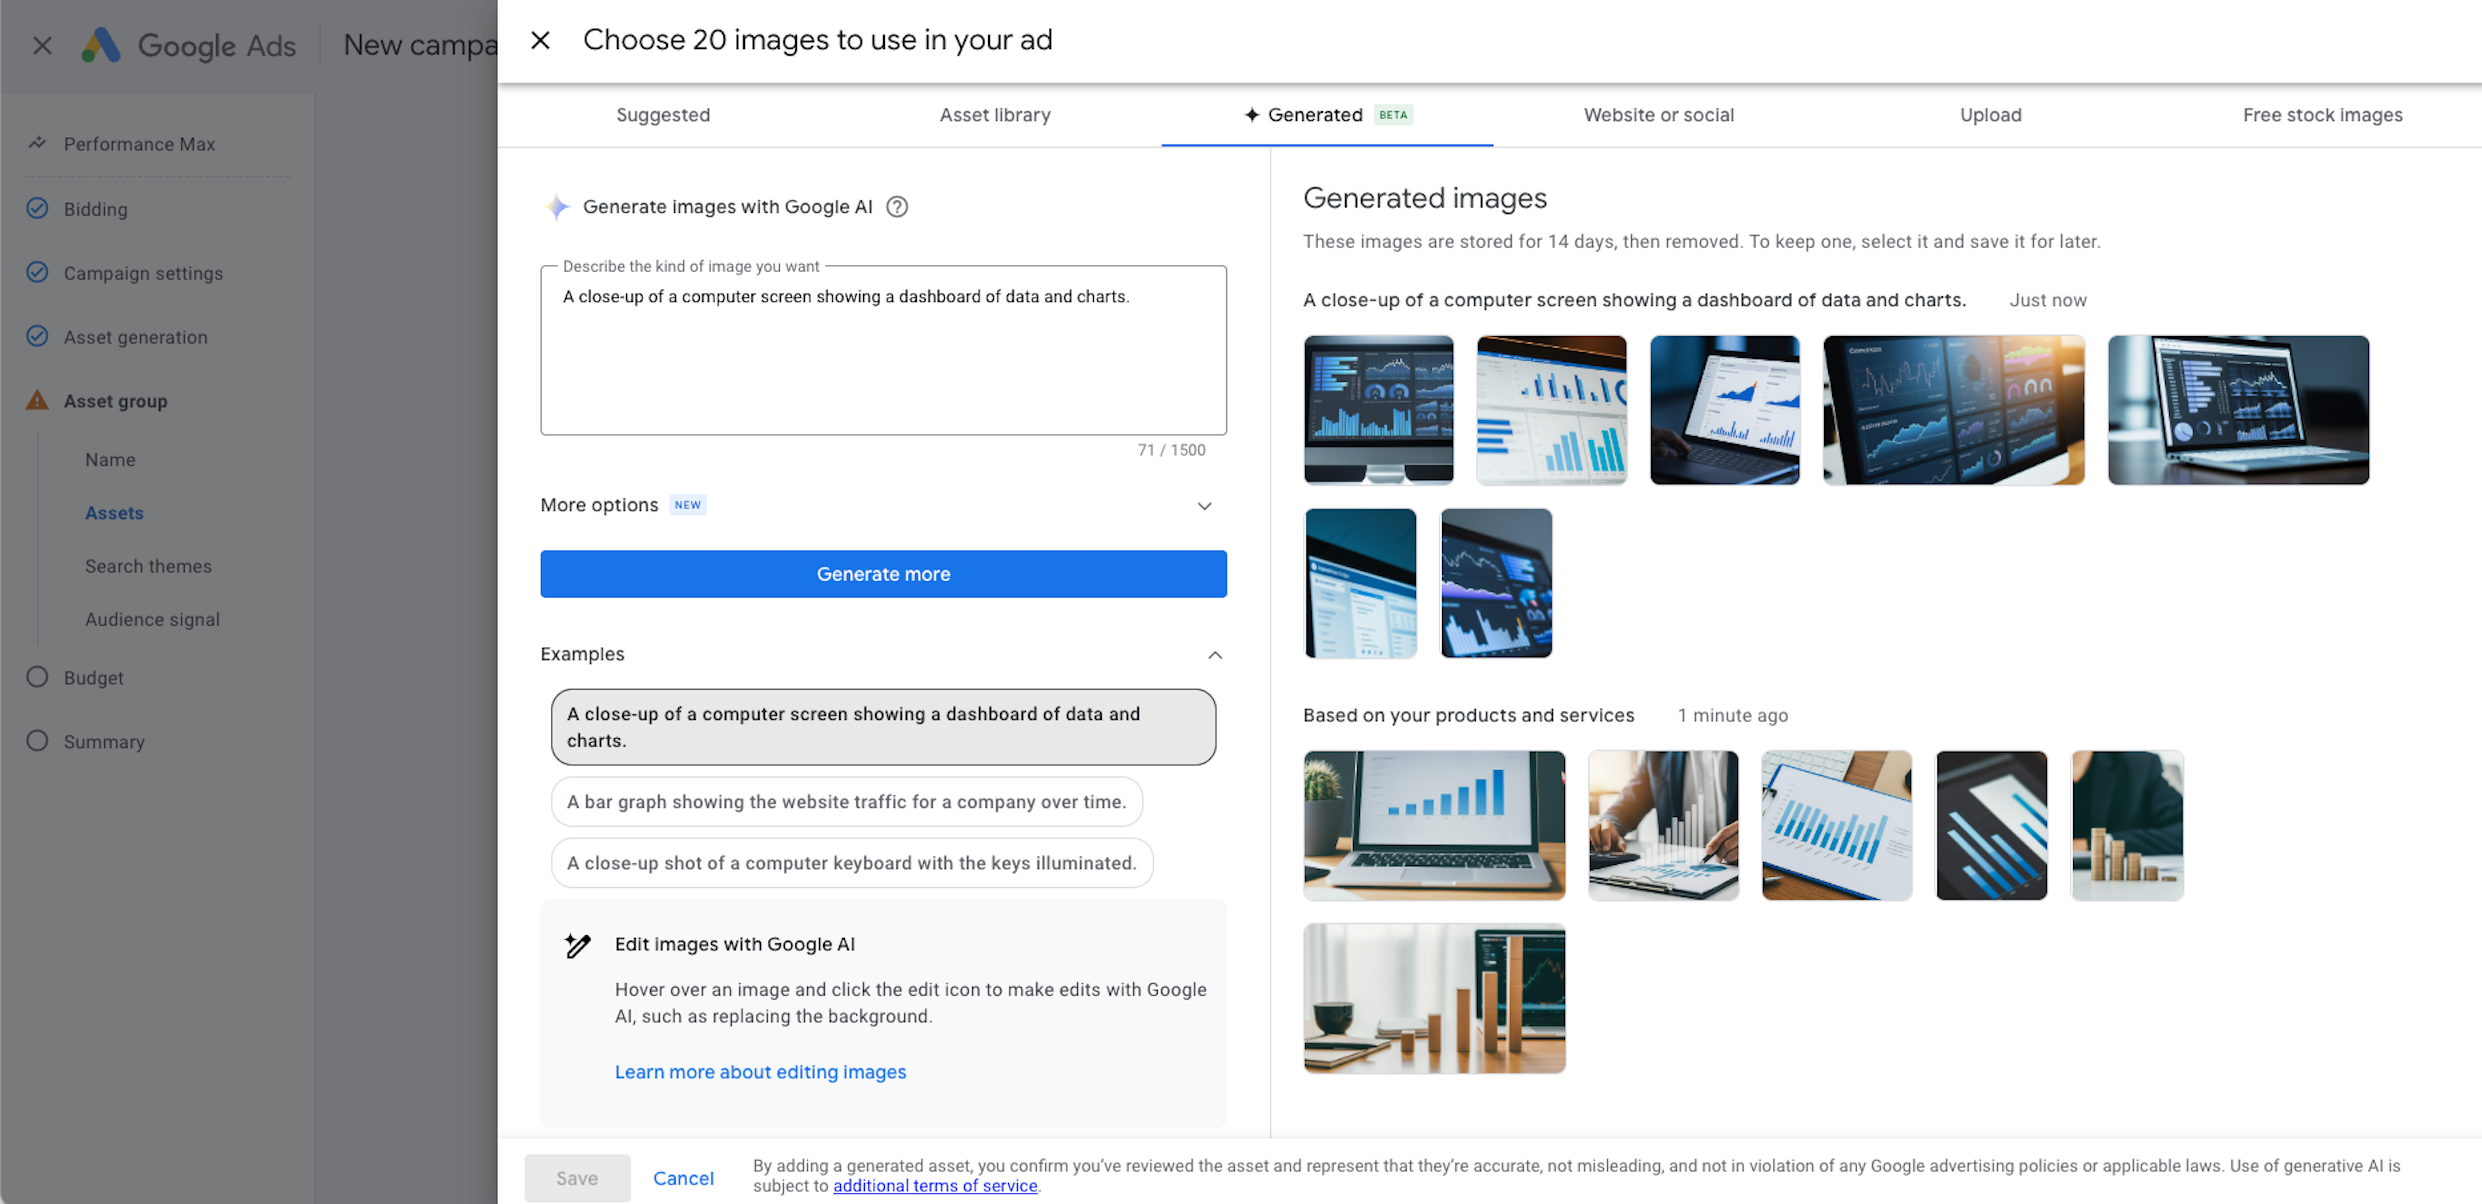 Use prompts to generate images with AI for your campaigns.
#Search themes
Search themes gives you the option to add in phrases or words for targeting, it feels just like adding keywords to a search campaign, but search themes are merely suggestions for the algorithm. Just like with audience signals, Google is free to completely ignore the input.
Search themes can be beneficial if you are using shorter landing pages, which don’t contain all the relevant info - here, they can help to fill in the gaps, and make sure Google has all the relevant info it needs to find your customers.
Adding search themes can also help to optimise the performance of Pmax quicker, by giving the algorithm additional information about search terms relevant to your business.
Just like audience signals, search themes are added on asset group level. You should align your search theme segmentation with the audience signal segmentation, to make sure you point the algorithm in the desired direction.
A major downside of using search themes in Pmax is the risk of cannibalisation, where your Pmax campaign competes with your existing search campaigns for the same traffic.
This can happen if your Pmax search themes overlap with your search keywords. While exact match keywords in search campaigns still take priority in the auction, Pmax search themes are treated similarly to broad and phrase match keywords. For tips to prevent this unnecessary competition, skip to the section on cannibalisation here.
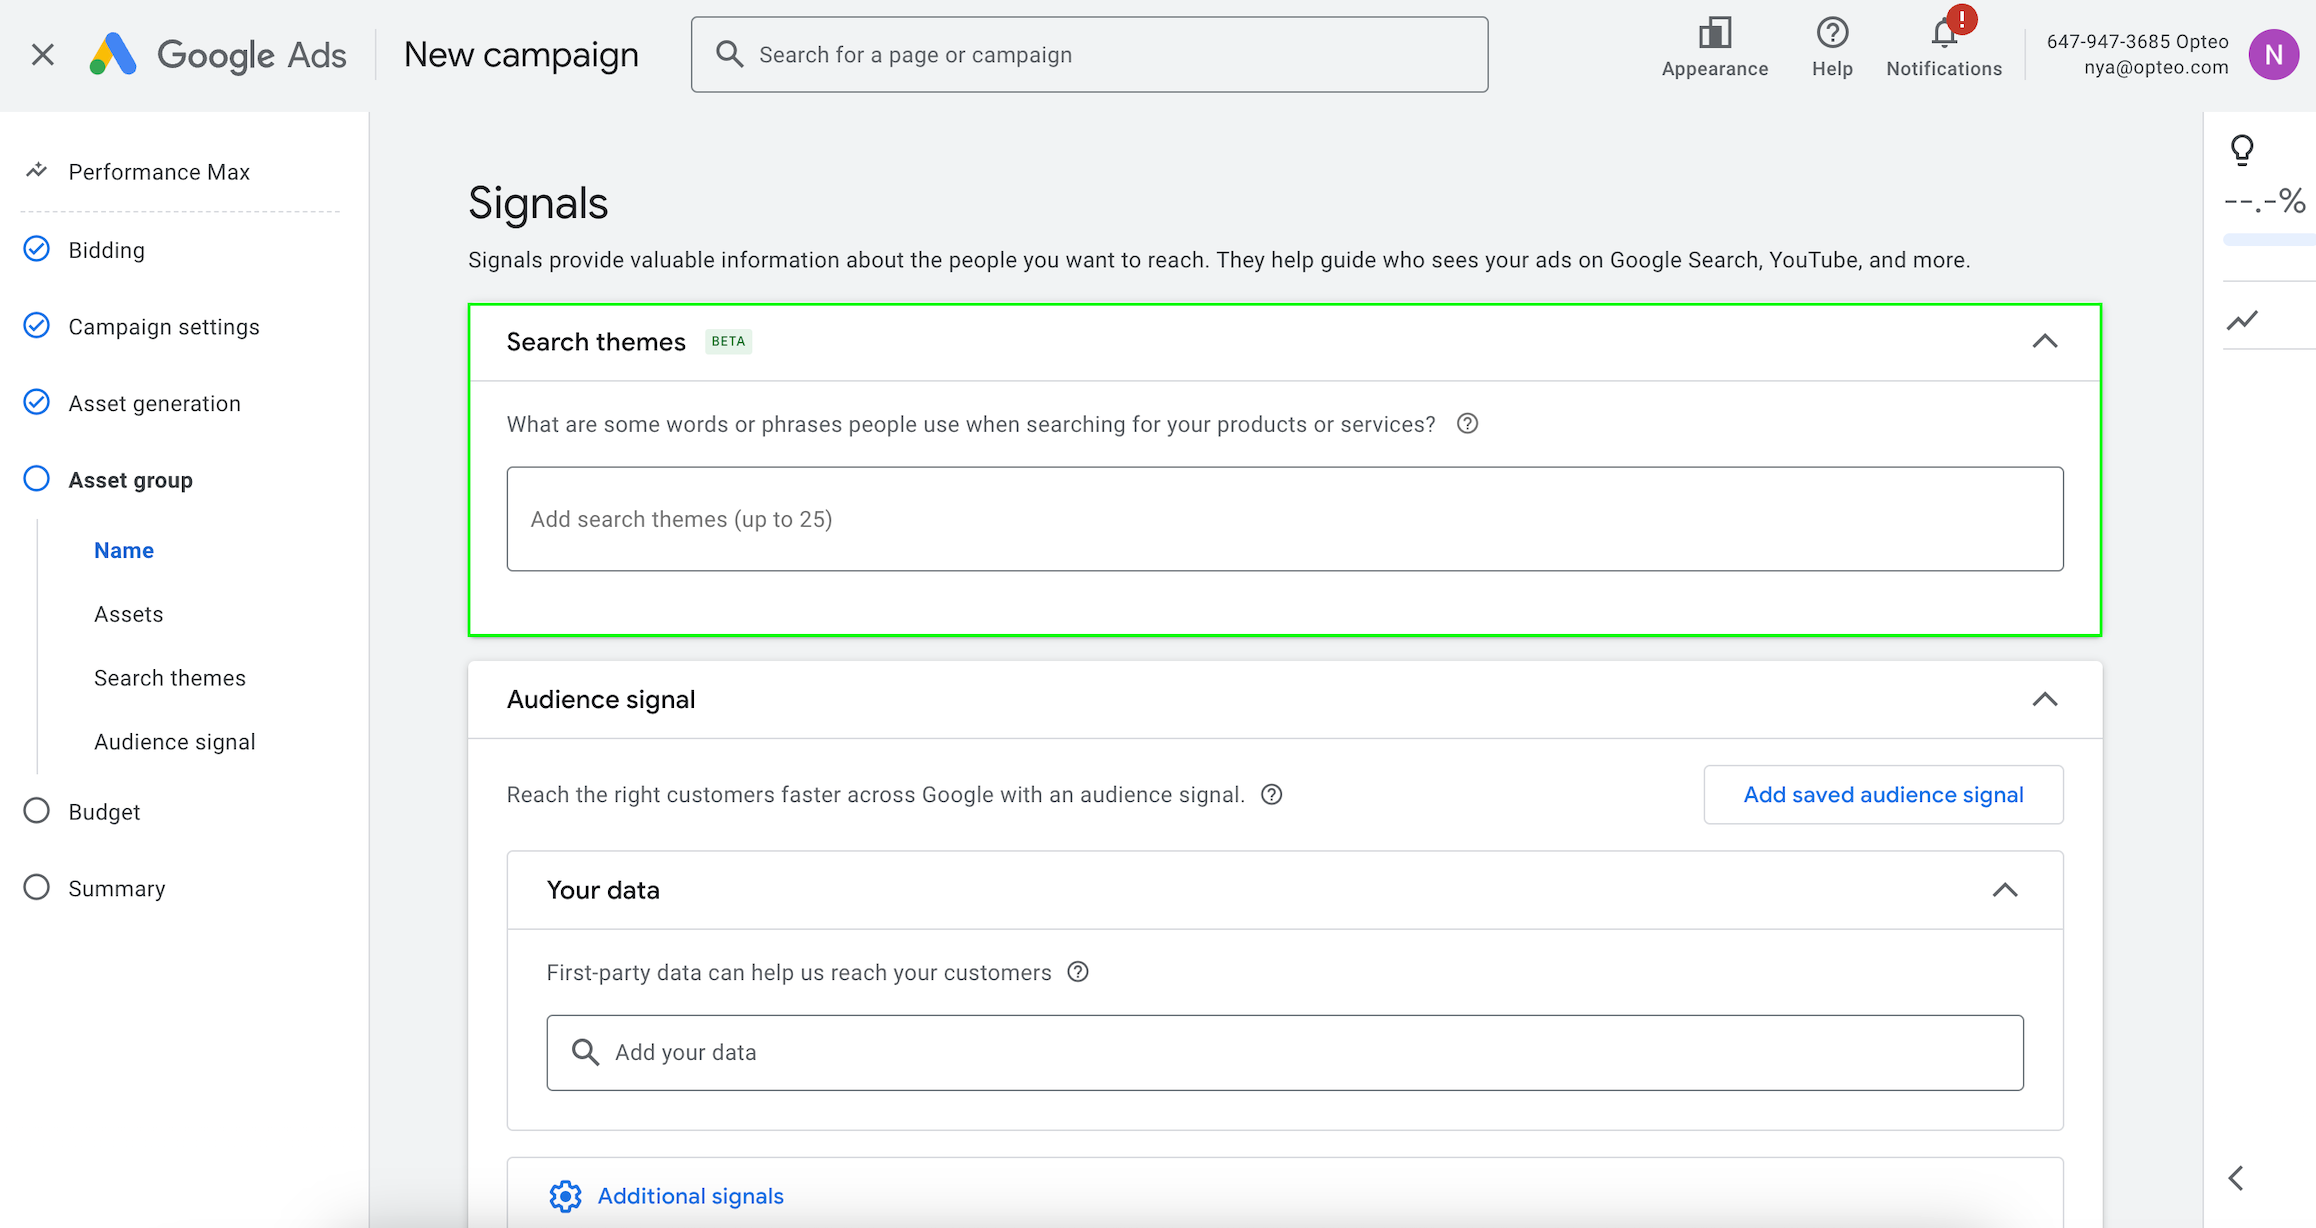 The search theme beta allows you to add words or phrases for targeting to your Pmax campaign, the campaign may or may not match on these.
 #Audience signals
Audience signals for Pmax are suggestions for targeting, which the algorithm may or may not use. They can help to point your campaign in the right direction, however they are not strict targets, and the algorithm can (and will) go beyond the audiences you specify.
Audience signals are tied to asset groups, and Google’s best practice for audience signals is to add them all to all asset groups. While this approach gives your campaign more information to work with, it can also make it too broad.
We propose the opposite as best practice: create several asset groups, and add only one audience signal per group. This way you can see the performance of each audience signal (a breakdown which is not otherwise available) to test and compare, and ultimately find the highest performing ones.
You can build out audience signals based on your own data, choose from Google’s predefined audiences, or define detailed demographics (such as household income bracket, parental status and gender). All of these can be layered on top of each other, to create additional segmentation.
Remember: for all audience signals, Pmax is allowed to go beyond them, or even completely ignore them.
See our detailed guide on audiences for Pmax here.
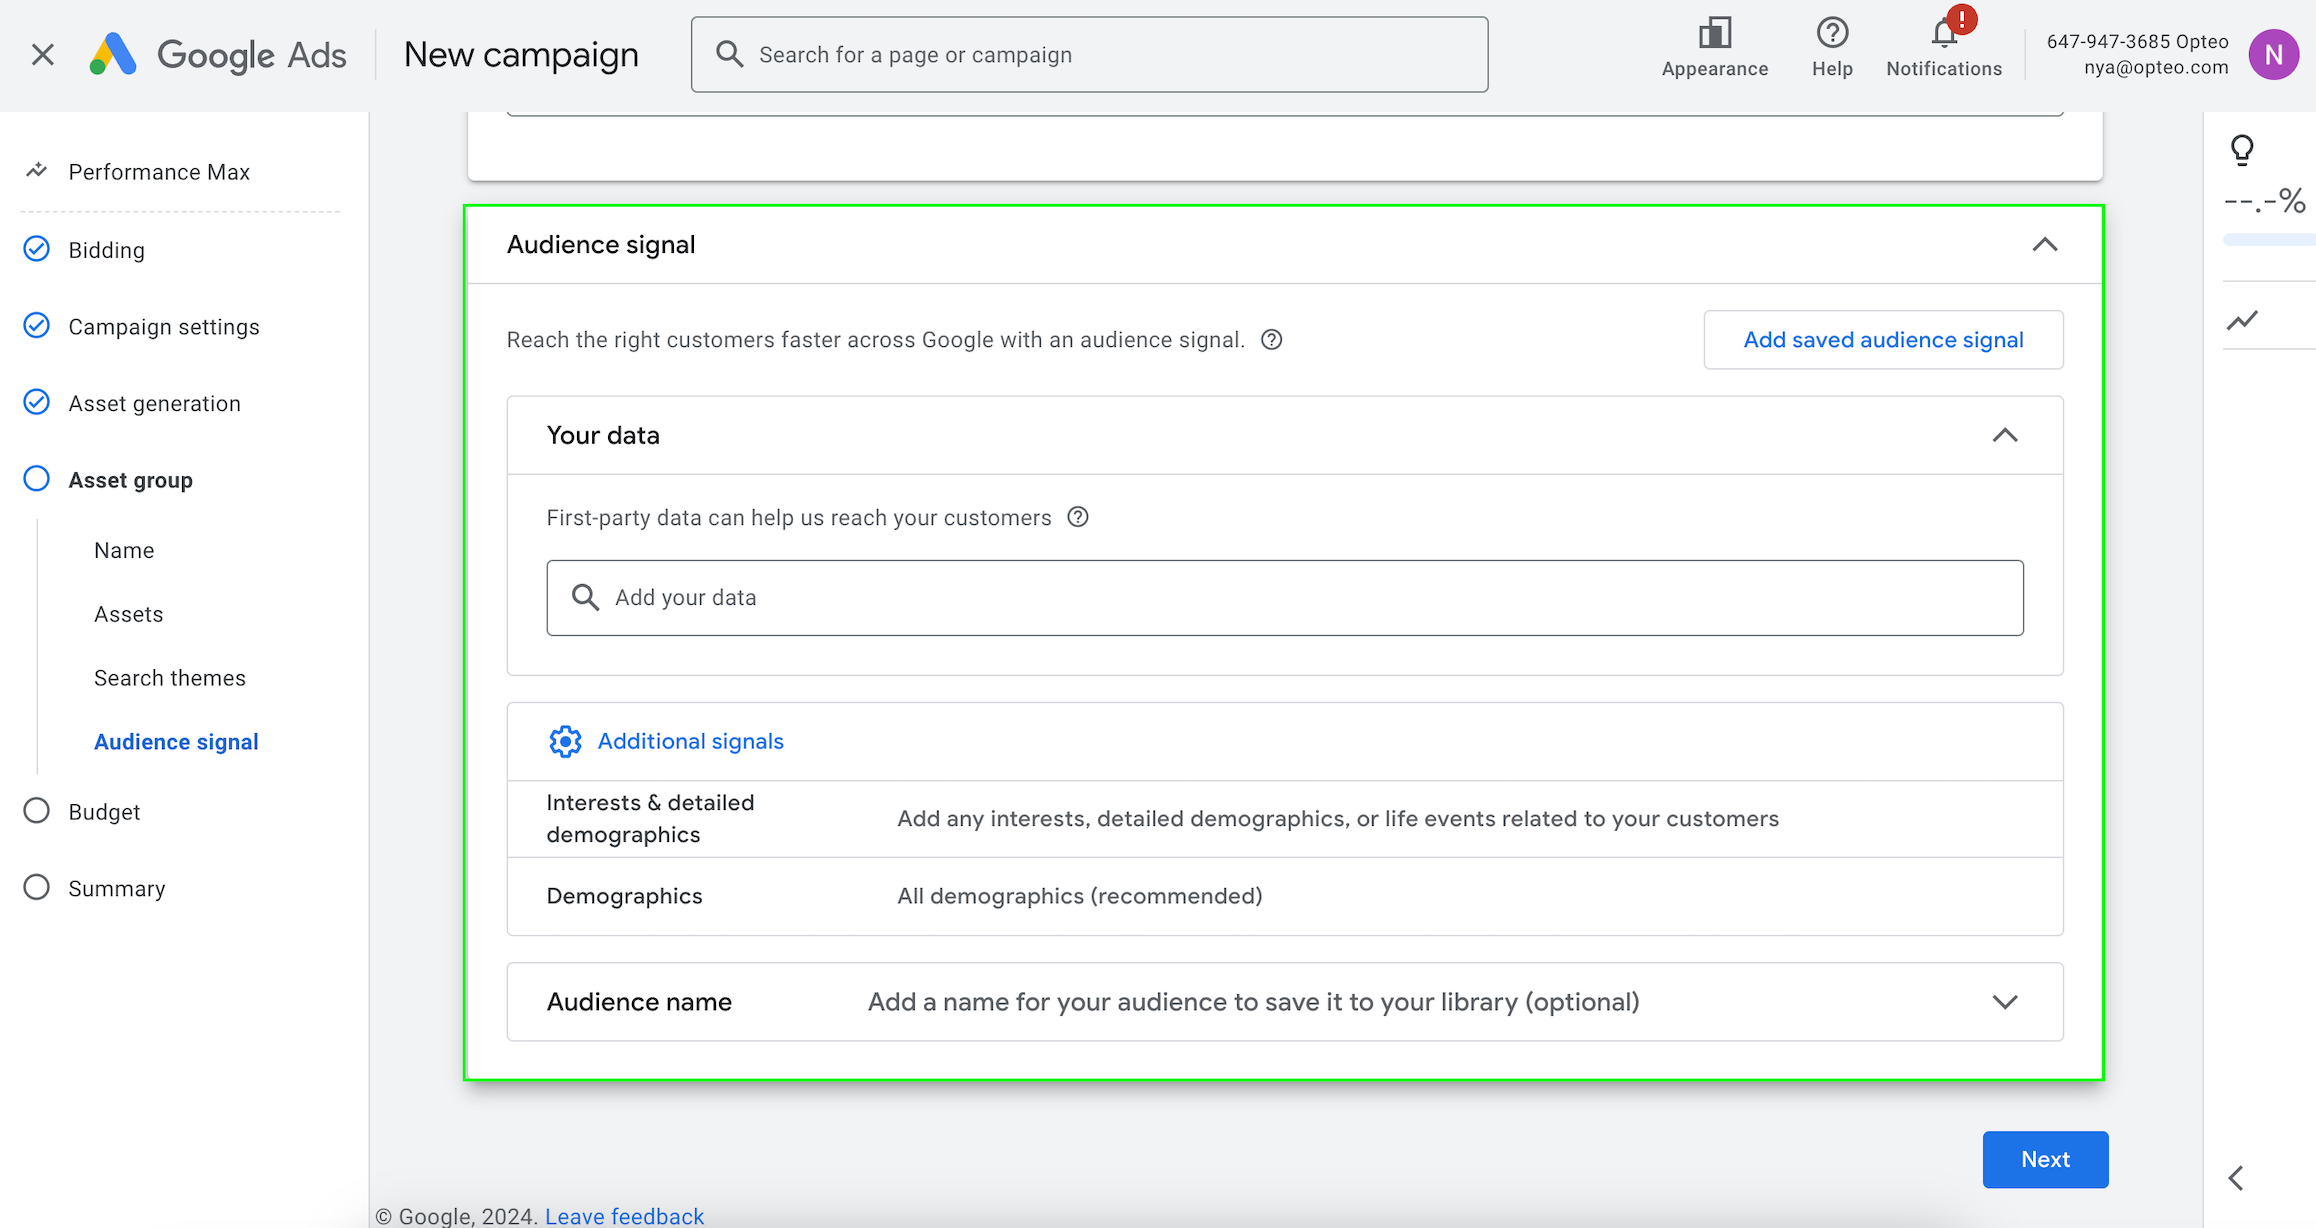 Audience signals for Pmax function as additional information for the algorithm on where to find you conversions, but not as actual targeting.
#Pmax for E-commerce
E-commerce is where Pmax shines, it was built to sell products and with the right setup can be a powerful tool. An important ingredient for Pmax to succeed for an e-commerce business is structured data.
The larger data sets you have, the better Pmax is likely to perform, and the more important structuring it is as well. Having well structured data will enable you to segment your Pmax asset groups and campaigns.
#Campaign segmentation
Pmax works best with large amounts of data, so it is best practice to not “over segment” your campaigns. However, having only one campaign for all products can create problems, with some products not getting any exposure (so called “ghost” products), while your best sellers’ targets are too relaxed.
To avoid this, you may need to have a few different Pmax campaigns covering your different product segments. Having a “best seller” campaign, and a seperate “ghost products” campaign is a good start.
You can automate this process with third party tools, and labelizer scripts (such as the one created by Floris de Schrijver. Labelizer scripts for product categorisation allow you to automatically move products between categories based on their performance, ensuring their targets align with their results.
Bigger retailers may want to go beyond this campaign segmentation, to create a more complex campaign structure. Depending on your specific business goals, you may want to segment your products according to their sales cycle, seasonality, and price points, as well as their performance.
For Pmax to drive results, its important to have a set up which pushes products with high quality product detail pages (PDP), and a good profit margin.
#Asset group segmentation
After the initial segmentation into different campaigns, you can segment further into different asset groups.
Group products into asset groups based on who you want to target them to, and align this segmentation with your audience signals and search theme inputs more on that here.
#Pmax and standard shopping
When Pmax was launched, it was given priority over standard shopping campaigns. However, a recent update from Google has eliminated this ranking, letting standard shopping and Pmax compete on equal terms. This means standard shopping is able to take more market share, but also that your campaigns may compete with each other.
Using Pmax and standard shopping together has the downside of splitting up budgets and data volume, which can be particularly harmful for the performance of the Pmax campaign. There are, however, a few ways to use the two campaign types in tandem so they can feed each other.
Let’s take a look at some of the strategies advertisers have had success with:
Feeding shopping with Pmax
Using Pmax and shopping together is a fantastic way to leverage the strengths of both, to enhance each other.
Pmax is great at finding the right customers through prospecting, and shopping is great at remarketing and generating sales.
The following setup wields the prospecting power of Pmax, to feed standard shopping campaigns warmed up traffic.
- Start by setting up your Pmax campaign as usual, but with slightly looser targets than what you are actually aiming for (you will balance this by setting tighter targets in your Shopping campaign).
- Your Pmax campaign should have the larger share of the budget between the two, as this is your core performer.
- Set up your shopping campaign targeting the same product feed as your Pmax, but set targets tighter than what you are aiming for on average.
- The shopping campaign is auxiliary to the Pmax campaign, and should have a smaller share of the budget.
- Set your shopping campaign to only target the best performing audiences, such as website visitors, cart abandoners, or viewed product page (and make sure to set the audiences to ‘target’ rather than ‘observe’).
- Set the shopping campaign’s feed priority to ‘high’ (you find this setting in campaign settings > additional settings > campaign priority).
Once you’re set, continue to evaluate the performance of both campaigns. Your Pmax campaign should get continuous impressions and clicks in order to feed the shopping, and your shopping campaign ROAS should consistently outperform Pmax.
Branded shopping, non branded Pmax
One strategy for using Pmax and standard shopping together, is to exclude brand from Pmax, and then create a standard shopping campaign only for branded search.
This requires time to set up, and ongoing maintenance, but has yielded good results for some advertisers. To use this setup follow the steps below, and always keep track of your campaigns’ performance, to see if this strategy is actually bringing home the results you’re after.
- Set up your Pmax campaign, excluding brand either by using the brand exclusion function, a negative keyword list, or both.
- Set up your standard shopping campaign for branded traffic and add your brand as exact match
- Create a negative keyword list and add it to your standard shopping campaign.
- After the campaign has run for a day (or a few hours, depending on your volume), open your shopping campaign search term report, and insert the filter: ‘search term does not include [branded search term + ALL misspellings]’ and set ‘added/exclude’ to ‘none’. This will show you all the non branded search terms your campaign matched to.
- Select all search terms and choose ‘add as negative keyword’.
- Select add to negative keyword list, and choose the negative list you created in step three. Add all these search terms as exact match negatives.
- Click ‘save view’ to be able to easily reuse it next time.
- Make it a daily exercise to add the non branded search terms for a few days, and then reduce it to a weekly task.
This setup works well with using maximize impression share on your branded standard shopping campaign, leveraging the power of your brand for maximum visibility.
Scale your Pmax campaign in tandem, with realistic CPA/ROAS targets.
If you are looking to consolidate your budget into a single campaign, you are probably better off choosing shopping (if you are optimising for CPC), or choosing a feed only Pmax (if you are optimising for ROAS).
Create a feed only campaign
If you're using Pmax as a replacement for Smart Shopping and want to maximise your budget for Shopping ads, a feed-only campaign is a great option.
A feed only campaign refers to a Pmax campaign without any assets or asset groups. By refraining from adding assets, you avoid it spending budget on display, search, video and other channels.
Since this isn't how Google originally designed Pmax to be used, setting up a feed-only campaign requires workarounds to bypass the standard setup flow.
To set up a feed only campaign without any asset groups:
- Create a standard shopping campaign (note that even when selecting Shopping as campaign type, by default it now creates a performance max campaign. To avoid this manually toggle ‘campaign subtype’ to ‘Standard Shopping campaign’ during the setup process).
- Go to campaigns > experiments > performance max experiments > click the ‘+’ button to add a new experiment.
- Select ‘Test vs. Shopping campaign’.
- Select your newly created shopping campaign.
- Go through the create experiment flow.
- Once your experiment is live, wait 24h and then apply it to your campaign. You now have a Pmax campaign without any asset groups in it.
#Pmax for lead-generation
Pmax was very much designed with shopping in mind, and advertisers have had varying success with using Pmax for lead gen.
How well Pmax works for lead generation depends on your business type and how much customer data Google has. A private health insurance company is likely to see better results than an industrial B2B, where Google may not have enough data on your customers to optimise effectively.
One of the best ways to improve Pmax for lead generation is by adding conversion values. This feeds the algorithm information about the value of each conversion type, helping it optimise for the most valuable leads.
Before setting up Pmax for lead generation, it's important to build your search campaigns with a good level of granularity. This allows you to understand the performance of different search segments. When you add a Pmax campaign to the mix, you'll be able to more accurately evaluate its performance.
For most lead gen businesses, Pmax is unlikely to replace search, but it’s worth testing out both parallel and see what works better for your account.
#Value based bidding
Value-based bidding for lead generation is an alternative to targeting a CPA (Cost Per Acquisition). It’s especially useful when you have multiple conversion actions, as it helps Google understand the value of each conversion to your business.
Even if you only have one main conversion action for a lead, chances are you have more actions that are valuable to you. Advertisers typically add these as secondary conversion actions, when bidding for a target CPA.
This way, you feed the algorithm data and allow yourself to track user behaviours, while avoiding Google equating your soft conversions with your hard conversion(s).
This strategy has the risk of Google ignoring the secondary conversion actions, even though they are valuable to your business (and a perhaps an important step in your customer journey).
If, on the other hand, you add them as primary, you risk the algorithm bidding equally on soft and hard conversions, missing out on volume of your top priority conversion(s).
To avoid either of these scenarios you can instead make use of value based bidding, even if your conversion actions don’t have sales value attached to them.
You add all of your conversions as primary, and instead of pulling in a sales value, you define a value for each conversion type. Once you have defined a value for each conversion action, you set the campaign to optimise for target ROAS.
This way you tell the algorithm what each conversion action is worth to you, steering appropriate spend to each conversion action.
For this strategy to be a success, you don’t need to know the exact value of each conversion type. The most important part is to get the relationship of the values right between the different conversion actions.
Let’s say for example, you have two conversion actions: ‘trial sign up’ (high priority) and ‘webinar sign up’ (low priority). You may not have an exact calculation of what each of these is worth to your business, but you know that around one in ten users who sign up for a webinar end up signing up for a trial.
Your ‘webinar sign up’ conversion should then be worth one 10th of your ‘trial sign up’, if you define a value of $100 for a ‘trial sign up’ conversion your ‘webinar sign up’ conversion should then have a value of $10.
You can define conversion values by going to goals, selecting the conversion action you want to edit the value field.
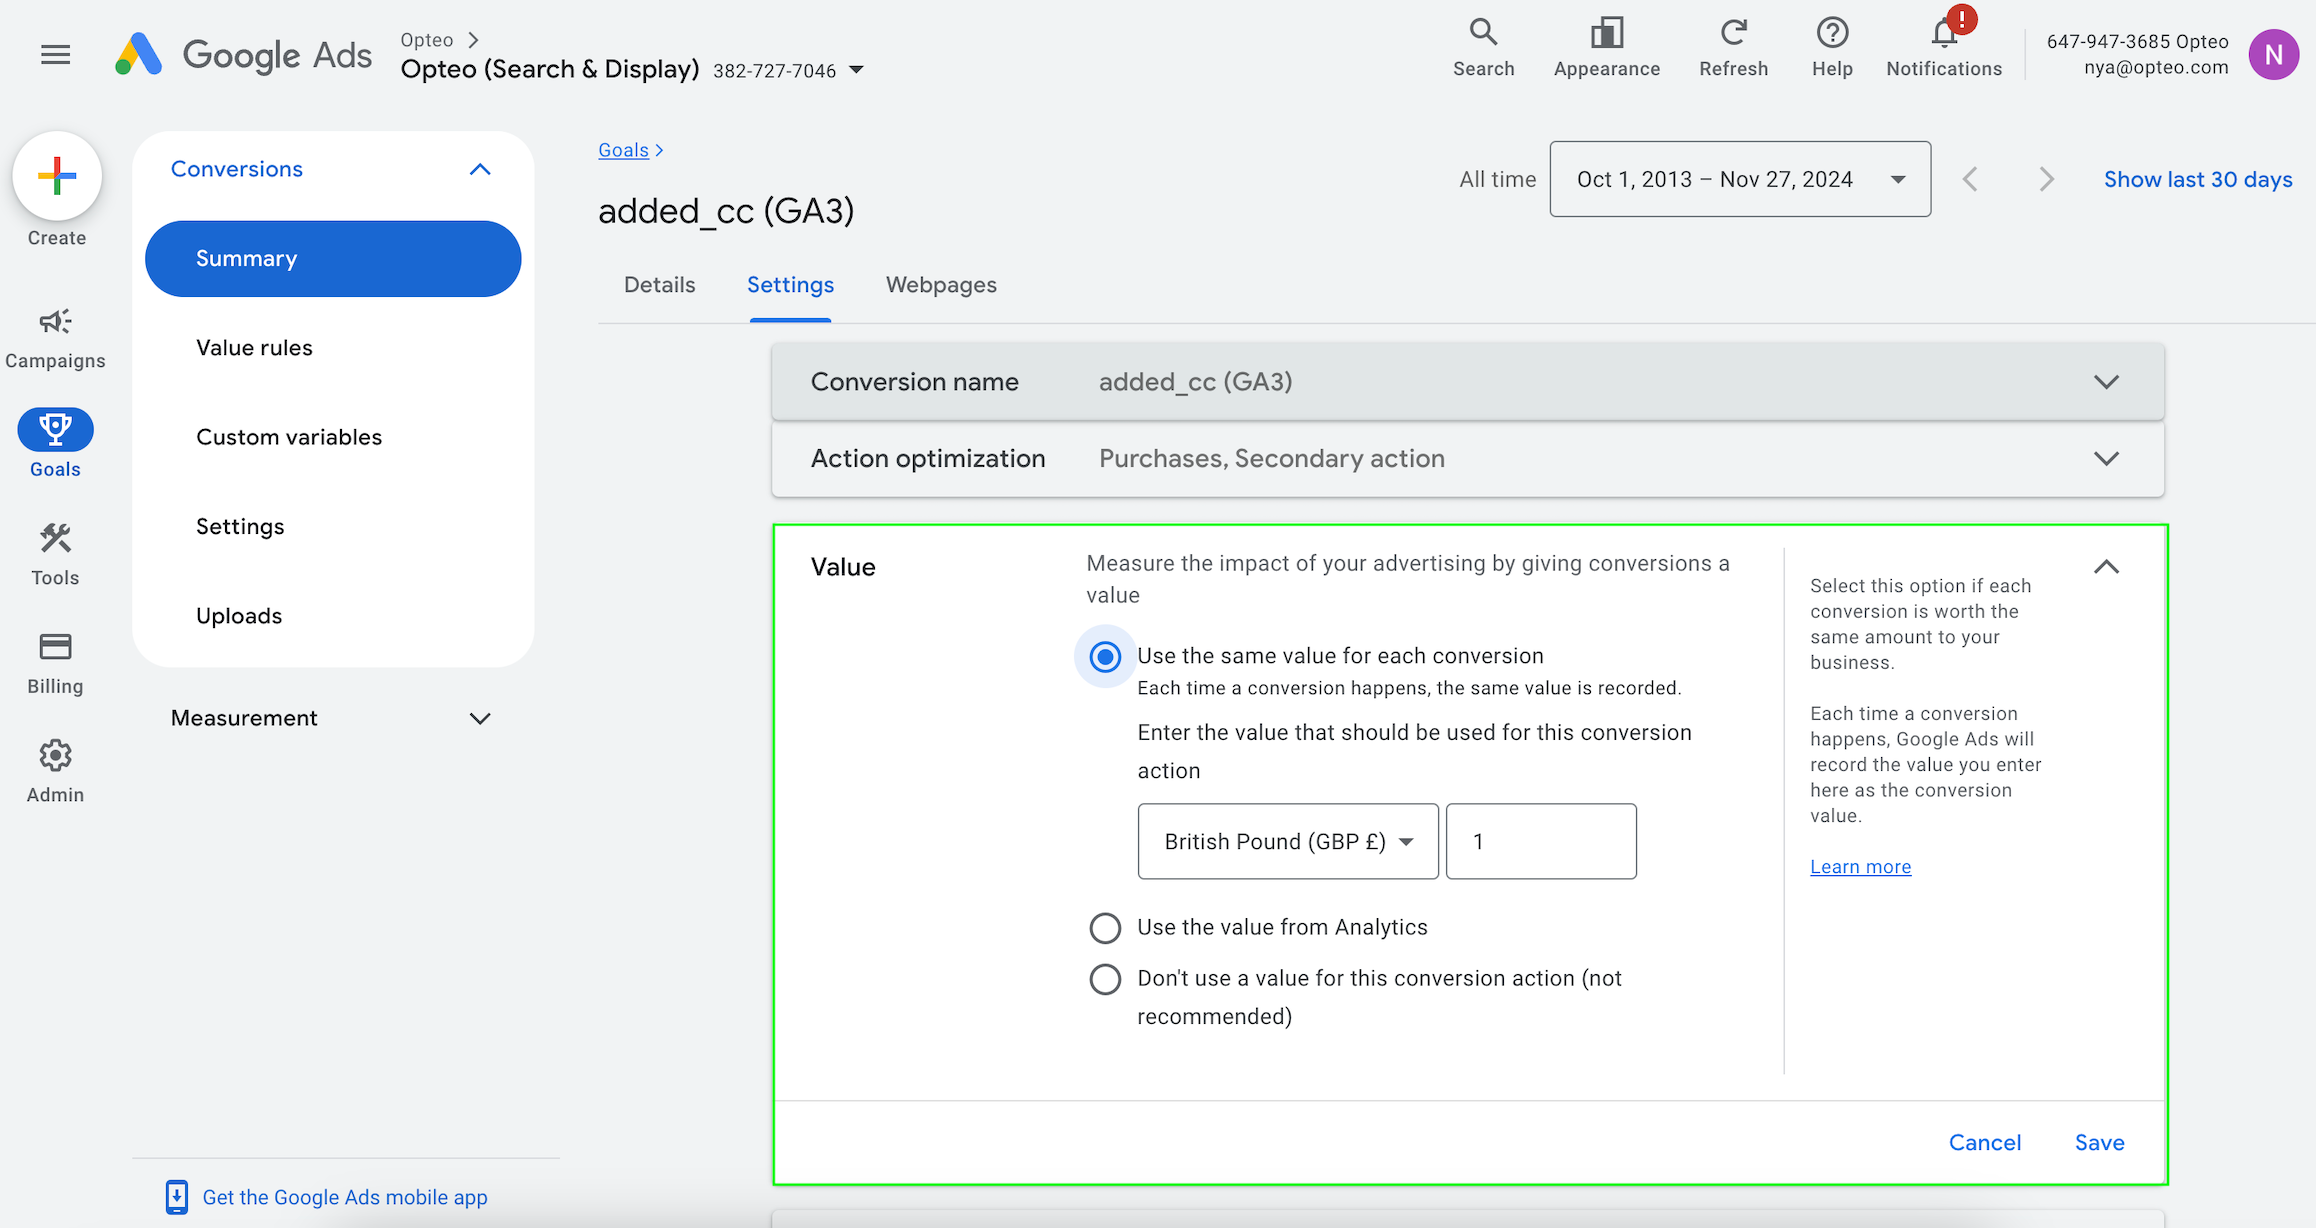 Goals > Summary > Click on the conversion action you want to edit > Click the drop down menu for the “Value” section.
 You can also set up conversion values from analytics, and pull in the values to Google Ads.
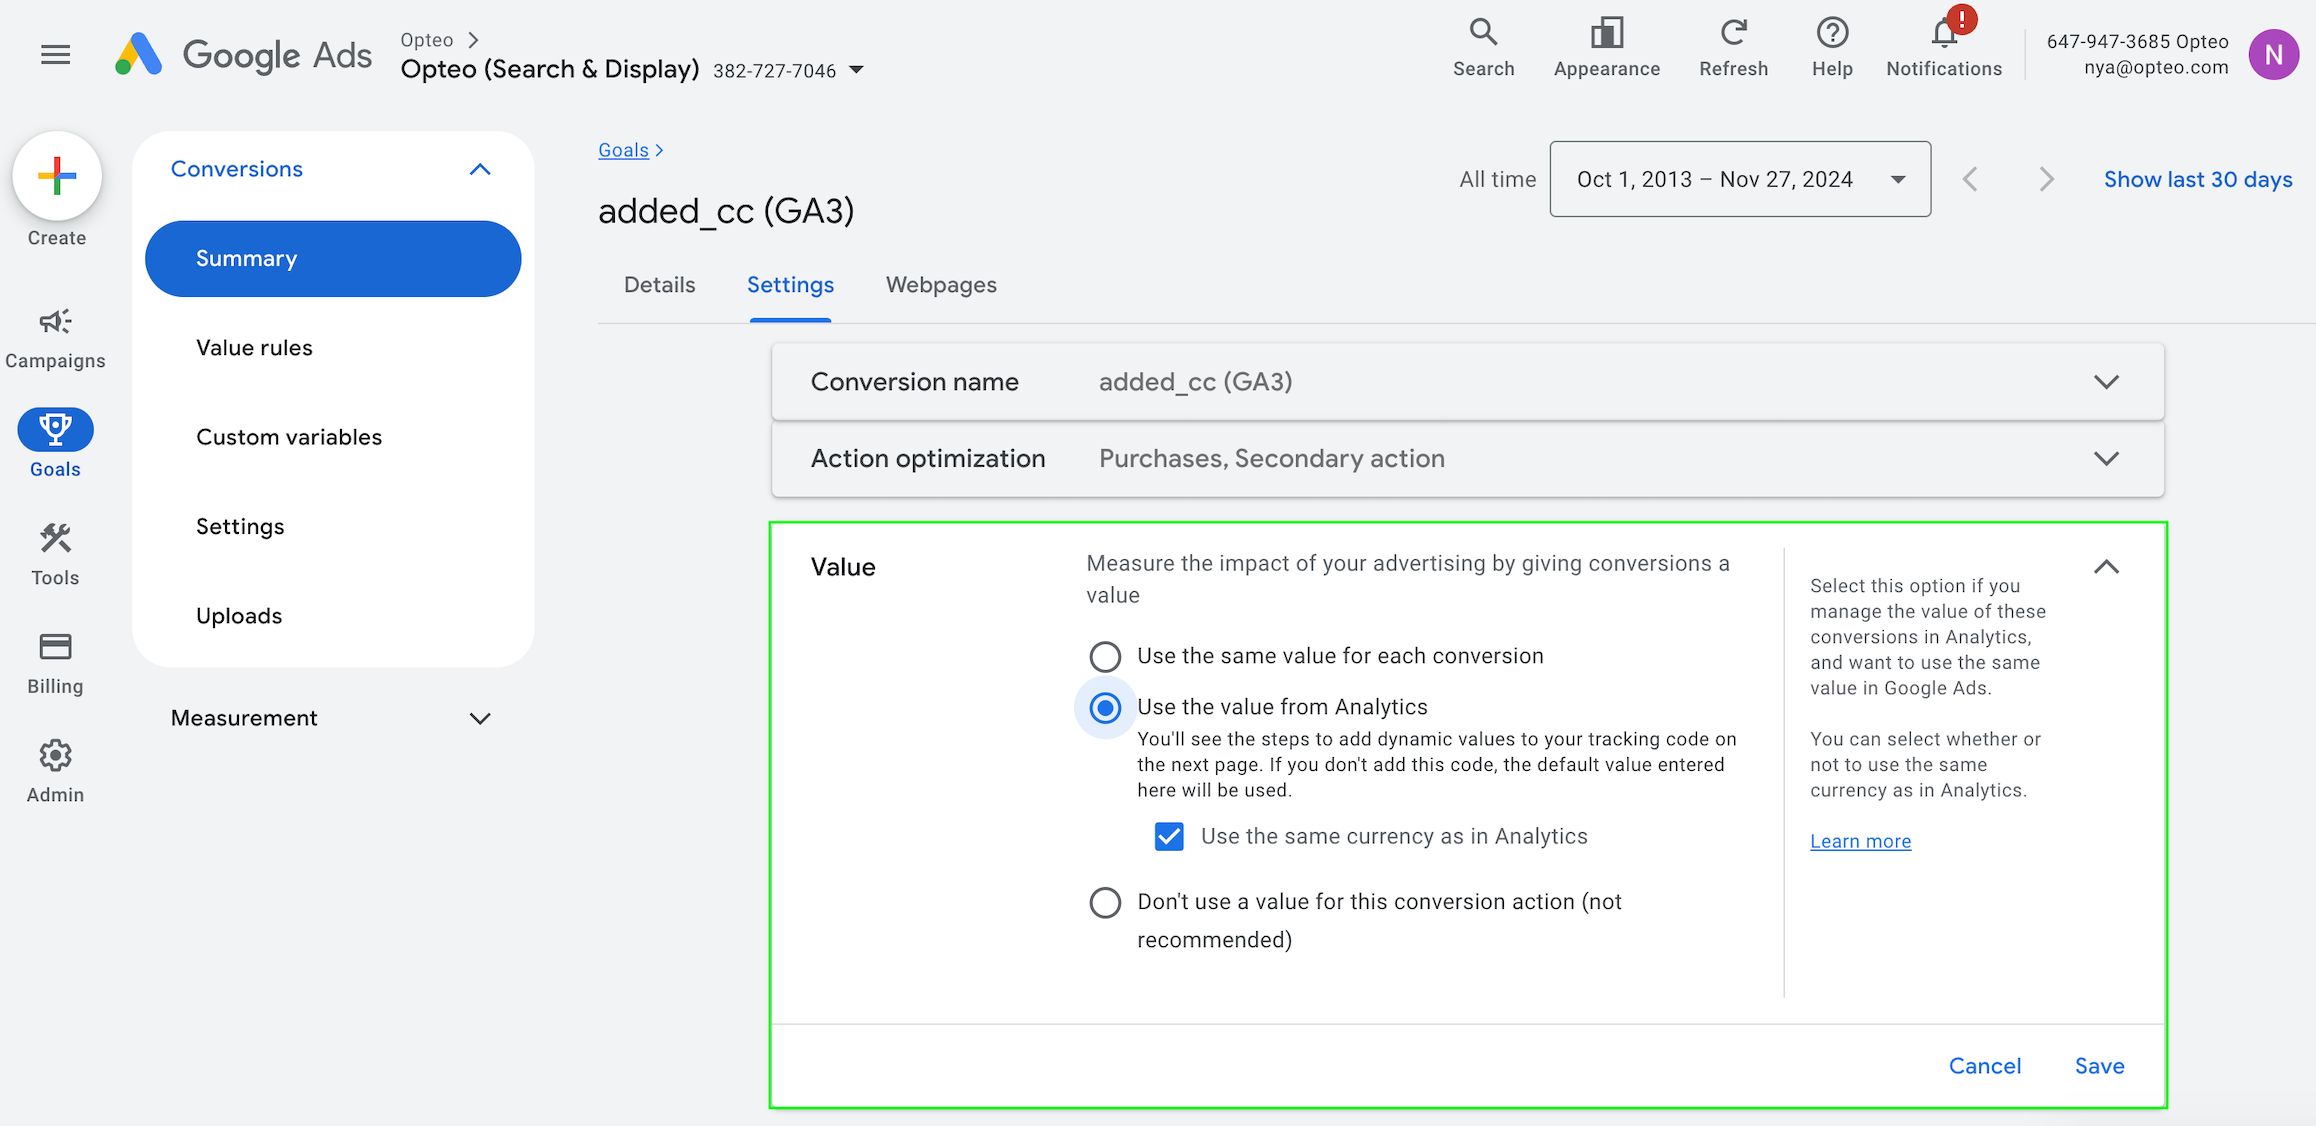 Use this function to pull in values from Google Analytics.
#Allocating budget between Pmax and search
Search should always be your starting point for lead generation. Whether or not Pmax will work for your account, search is likely to be the most important part of your Google Ads portfolio.
Once you’ve built a solid search presence, you can test out Pmax. How much budget should go to Pmax really depends on its performance — for some businesses, Pmax might even outperform search, but it’s important to start with a relative small percentage of your budget and keep a close eye on the performance.
Once the learning period is complete, compare the performance of non branded search in your Pmax and search campaigns. If Pmax is outperforming your search campaign, you can slowly feed it more budget. Keep evaluating the campaigns as you do this, to check that Pmax is keeping that performance up.
Always shift budgets gradually, with a maximum 20% adjustment at a time, to avoid triggering a new learning period.
It’s important to make sure you are looking at reliable data, as many advertisers have seen inflated numbers for Pmax. If possible, cross check conversion data with your CRM, to verify lead quantity and quality.
#Constraints
Pmax is great at casting a wide net to find users with a high probability of converting. By design, it’s the least restricted campaign type in Google Ads.
Google pitches Pmax as a product that works best without constraints, but most advertisers find the opposite to be true. If you add guardrails to Pmax, you can take advantage of it’s ability to go broad, without wasting budget on irrelevant traffic.
Even though Pmax wasn’t built for restrictions, there are quite a few options for adding constraints to your campaigns, let’s look at different options and their advantages.
#Restricting targets
Pmax has almost unlimited inventory. This makes it very easy for it to spend money. Some of the inventory available is of very low quality, and you should avoid investing in it, where possible.
To steer Pmax away from bidding on this low value inventory, it's important to set tighter targets. If your targets are too loose, Google may meet them but assume you're satisfied, rather than striving for better results. Instead of optimizing, it could end up spending your remaining budget on junk.
By setting tighter targets than you would for other campaign types, you ensure Pmax is putting your money towards inventory with conversion potential. The goal should be to find the point where Pmax doesn’t have any surplus budget, after meeting your targets.
#Content suitability exclusions
Exclusions are essential not just for efficient spending but also for protecting your brand. Pmax has access to a vast range of placements, some of which may not align with your brand’s values and could even harm your reputation.
Content suitability exclusions are set at the account level and also apply to Pmax campaigns. Adding exclusions for sensitive content is crucial to safeguarding your brand.
You can chose to exclude sensitive content based on five subtypes:
- Tragedy and conflict
- Sensitive social issues
- Profanity and rough language
- Sexually suggestive
- Sensational and shocking
Additionally, you can layer in exclusions based on content with specific labels, themes or keywords.
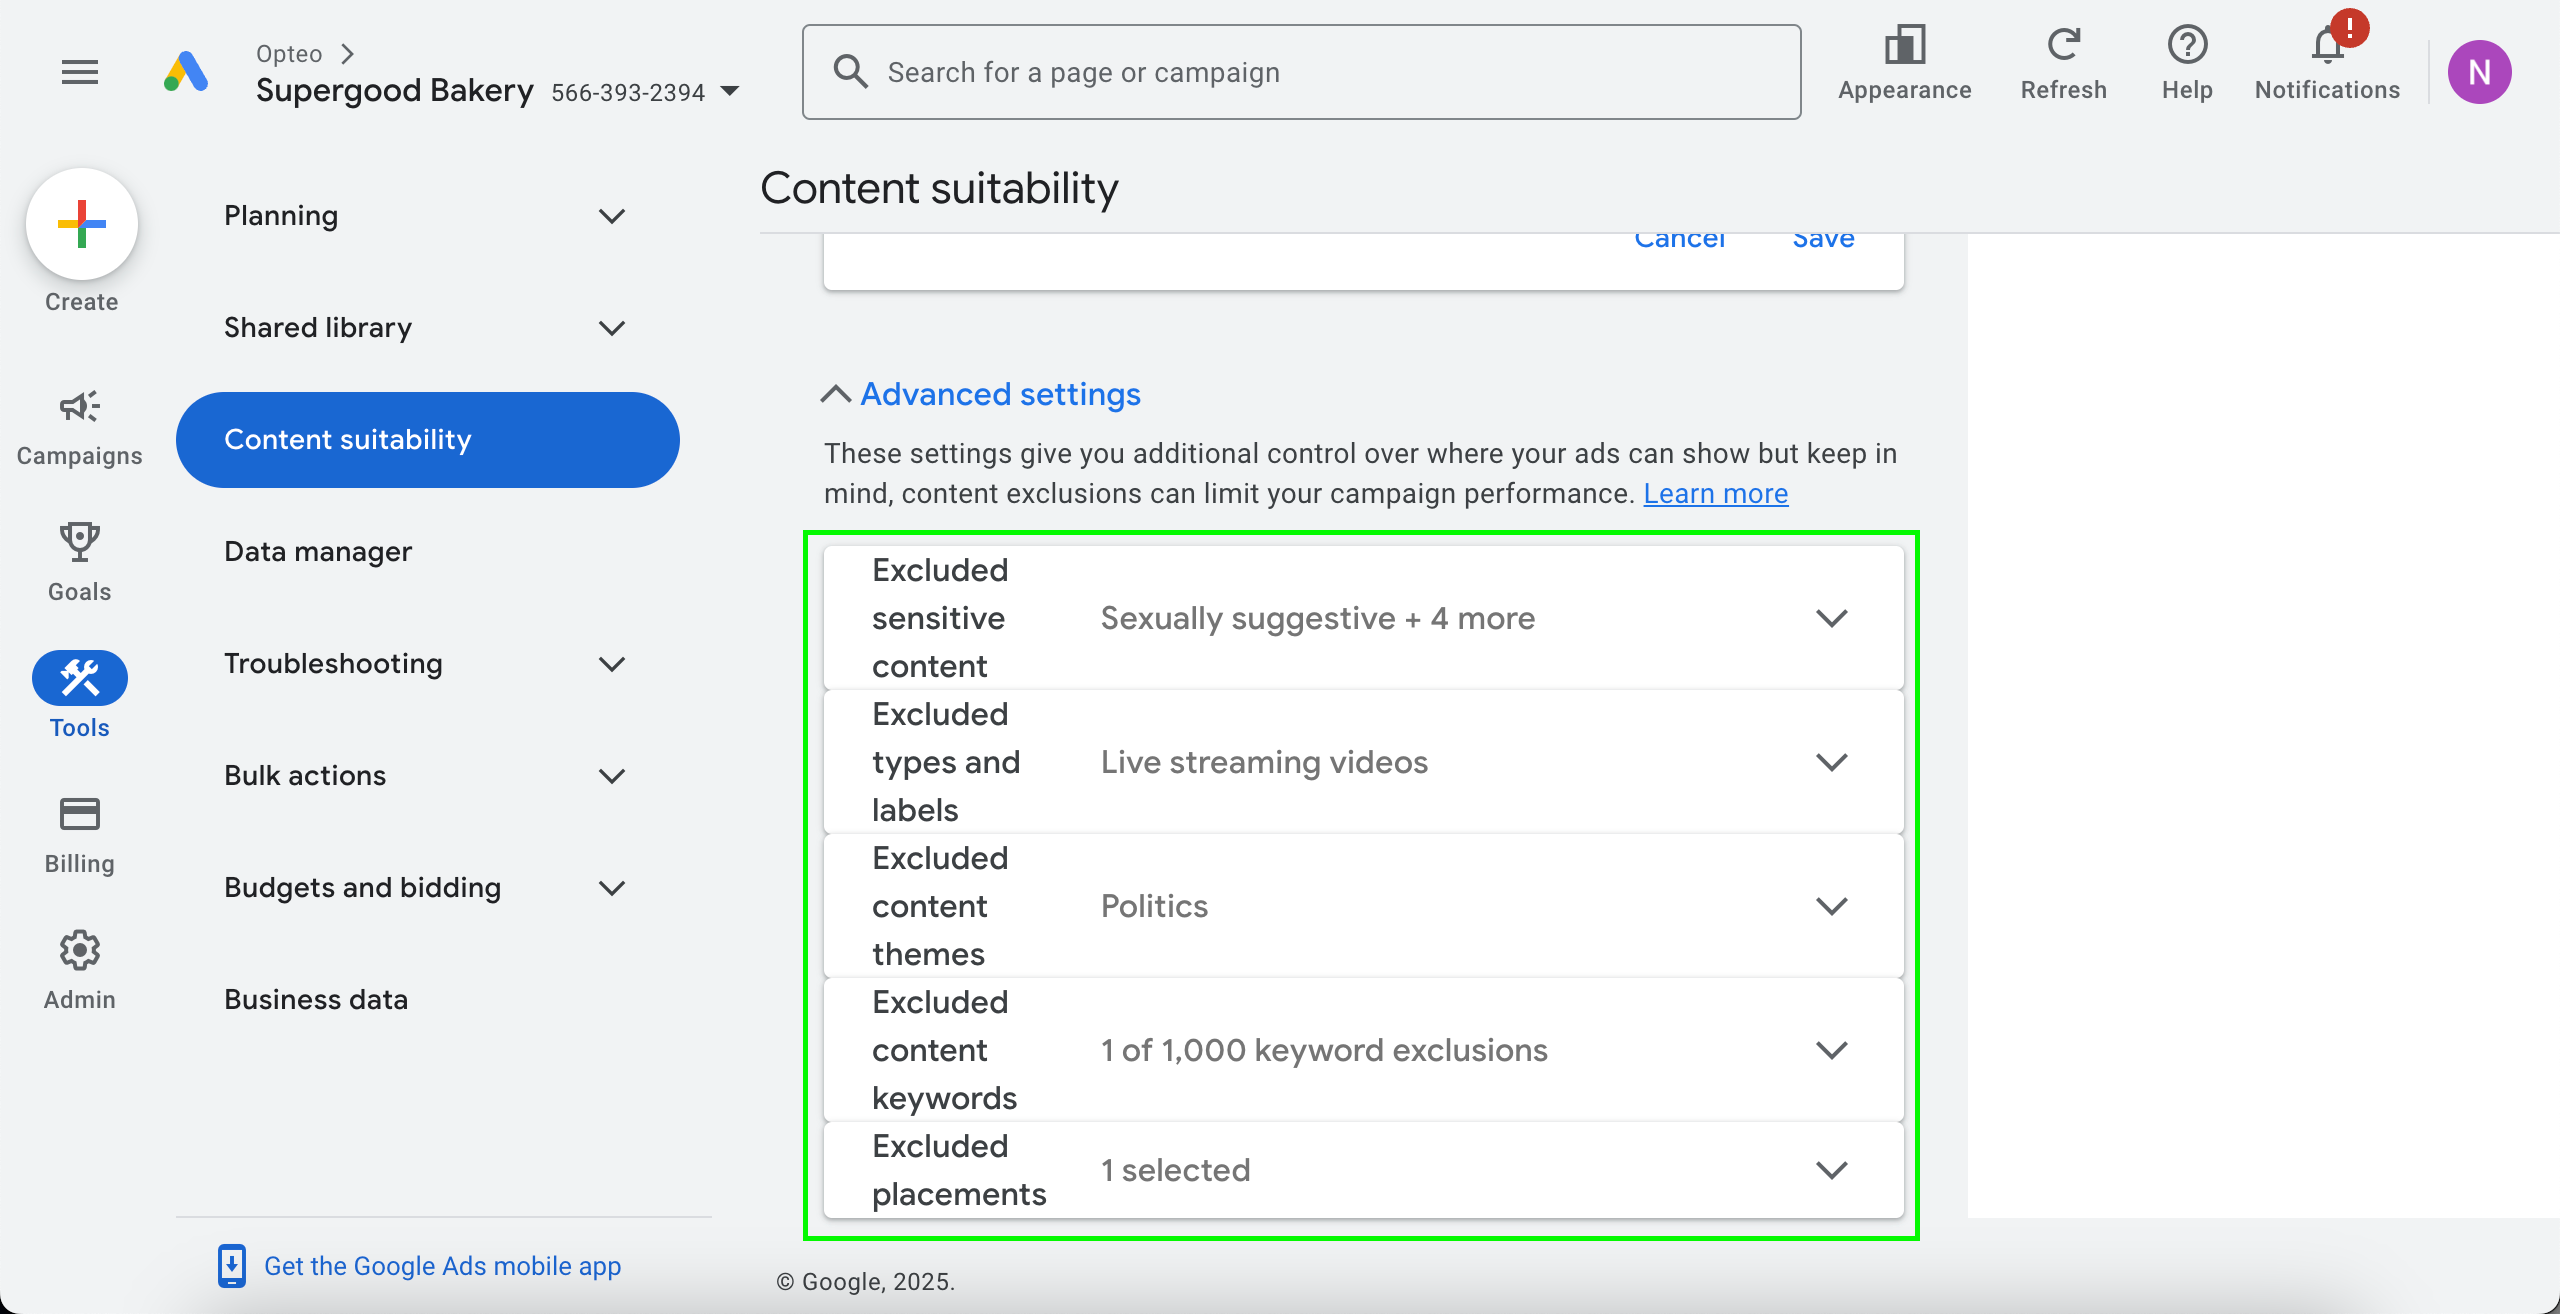 Tools > Content suitability > Advanced settings
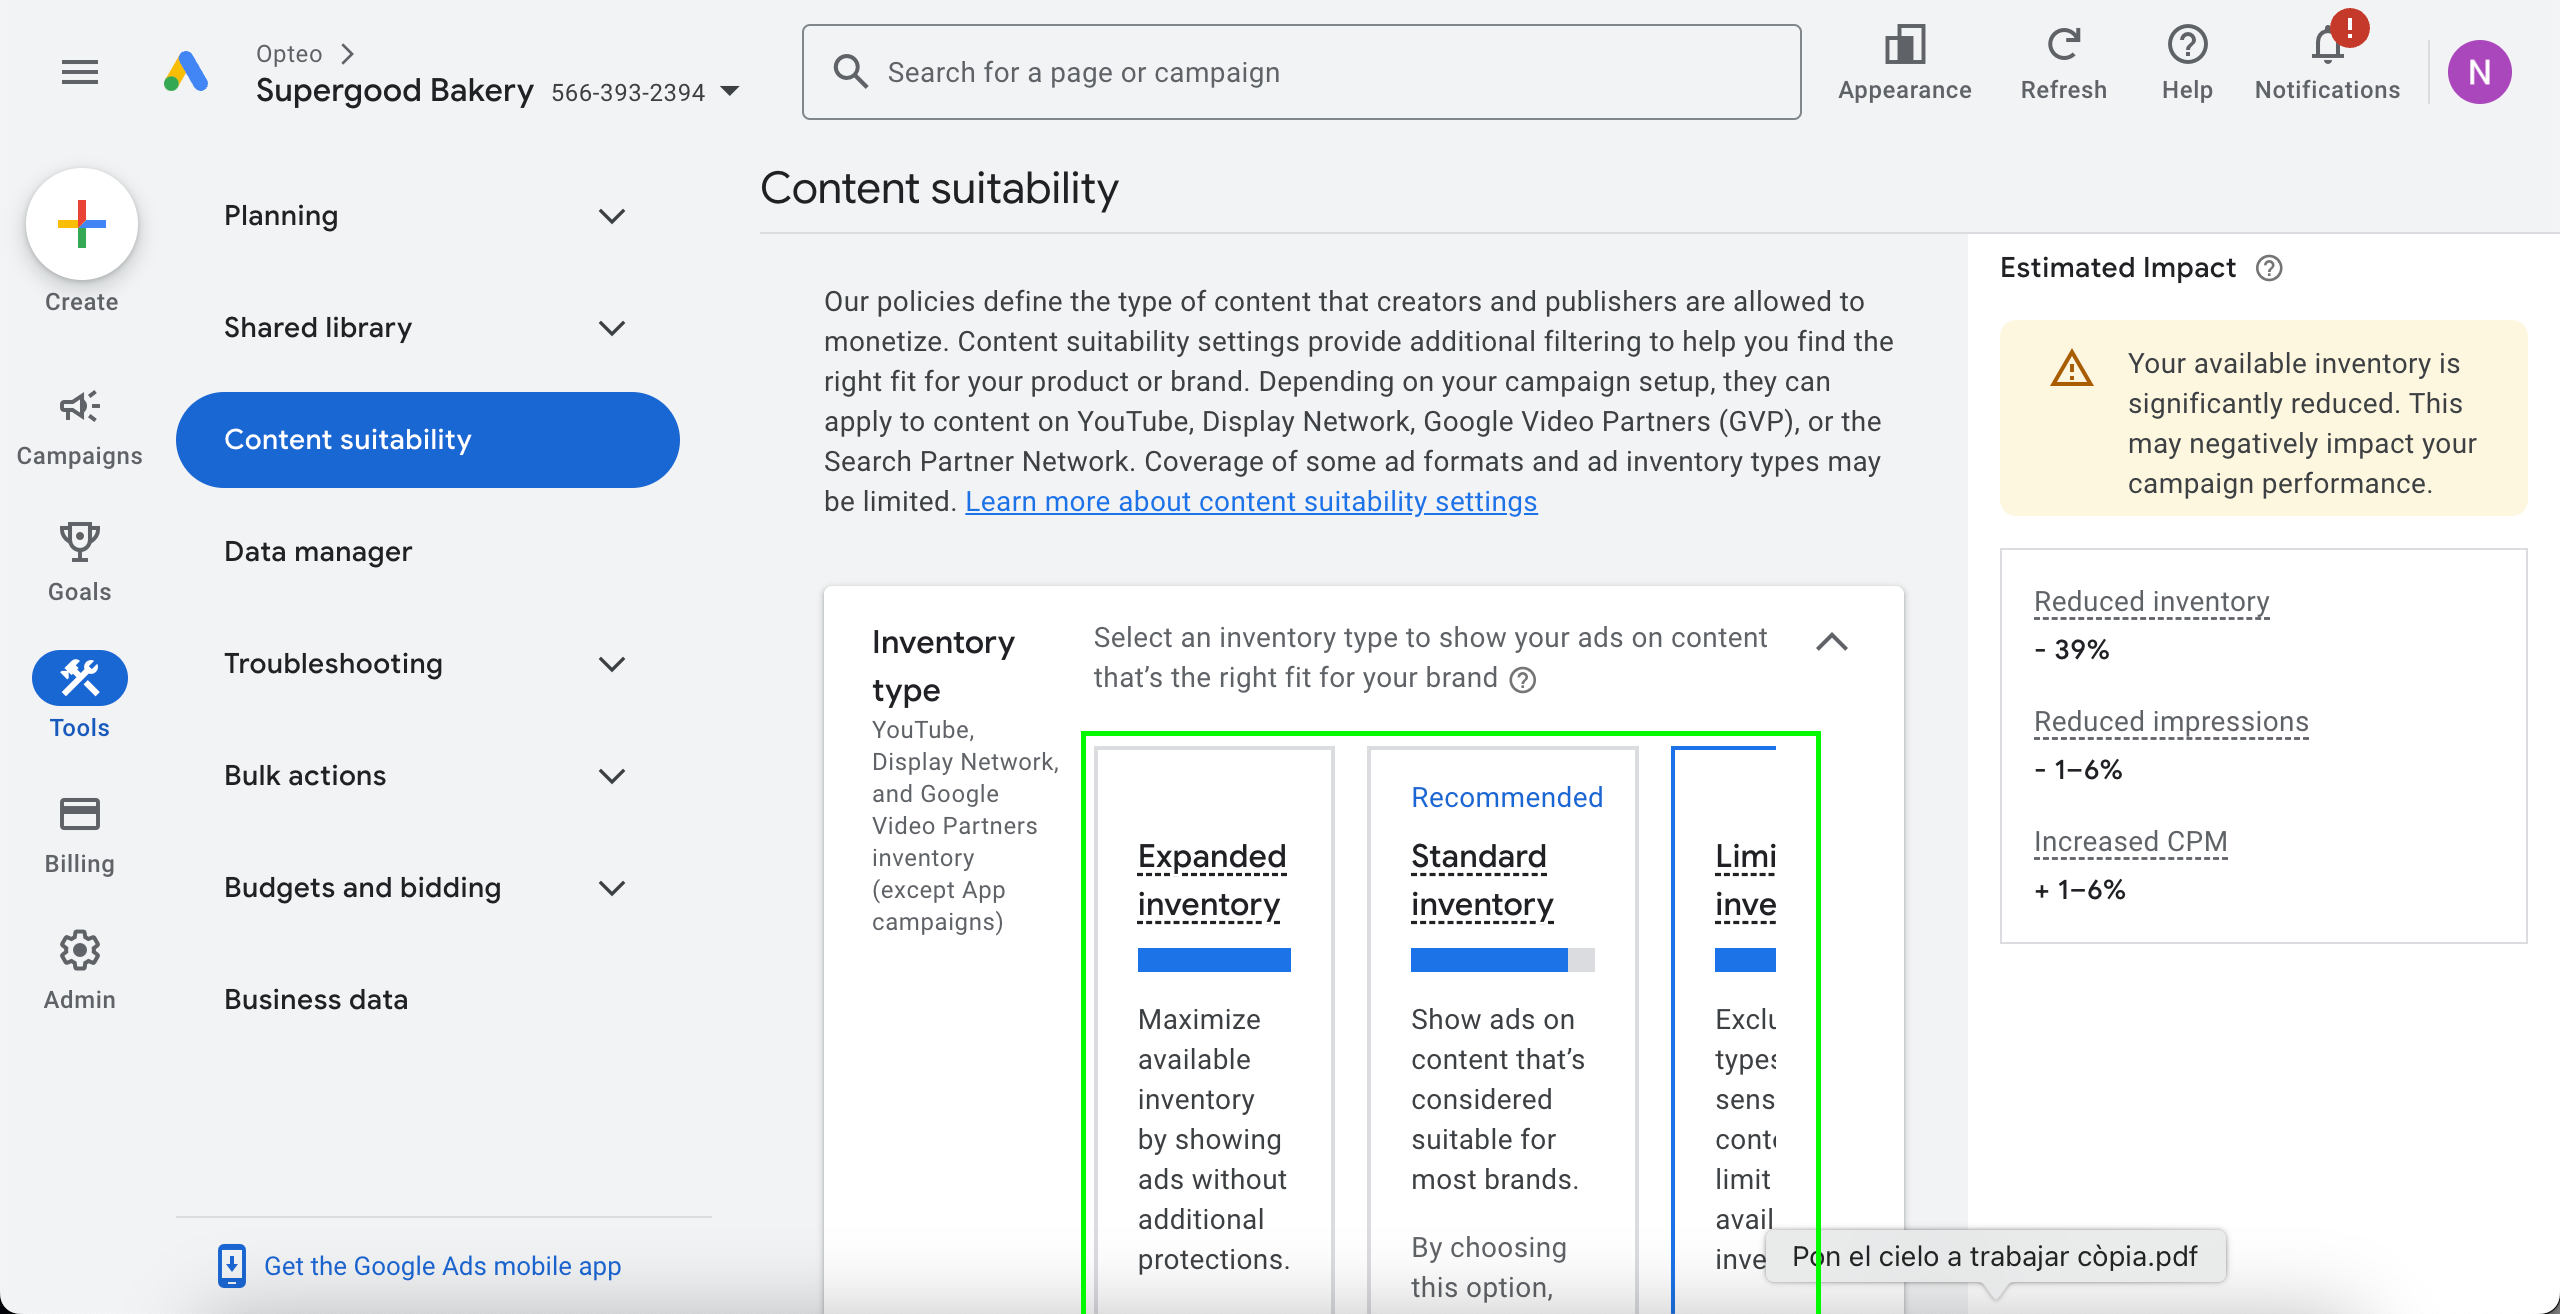
Inventory type is another way to restrict the content your ads are shown next to. They are based on content which contains profanity, is sexually suggestive, or has dramatised violence.
Standard inventory already poses restrictions on content with these elements, but choosing limited inventory ads further restrictions on content.
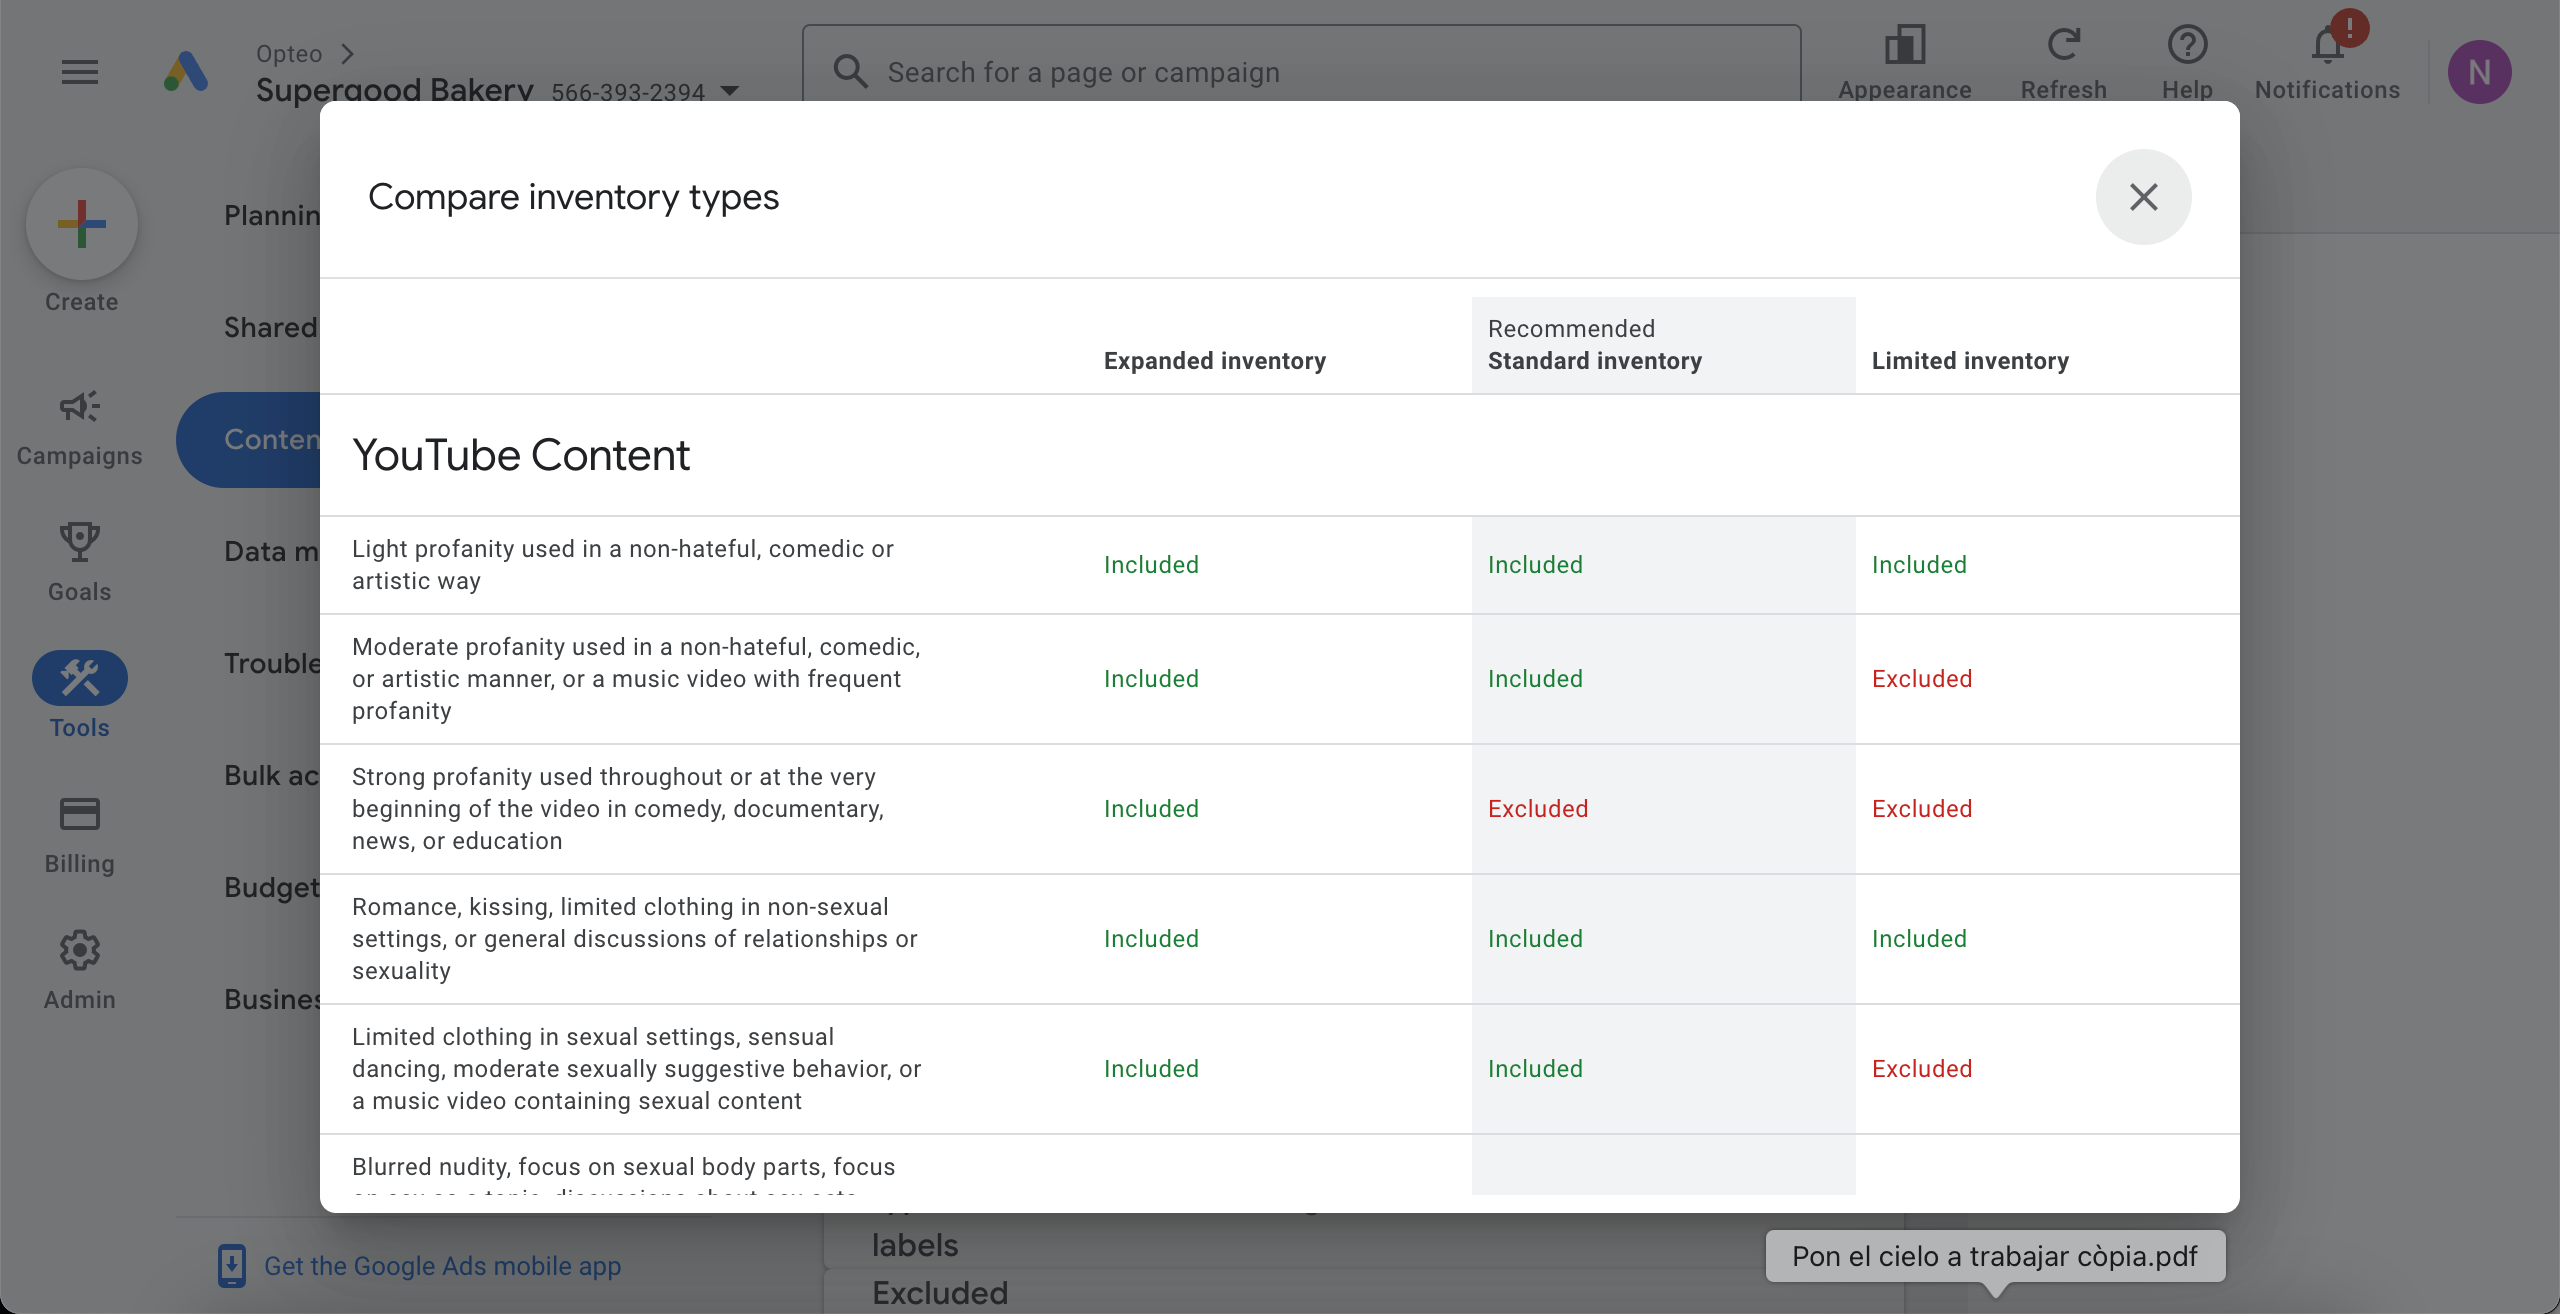 Tools > Content suitability > Compare inventory types
By restricting the inventory type, you reduce the total volume of YouTube inventory your campaigns have access to. If you are not running dedicated YouTube campaigns, toggle this setting to ‘limited’ to restrict Pmax’s ability to spend on YouTube.
Be mindful that the inventory type settings are account wide, and if you choose the ‘limited’ inventory type, it will also pose restrictions on your video campaigns.
 Tools > Content suitability
 Regularly review your Pmax placement report to spot sites where you don’t want your ads to appear. Adding exclusions proactively will help ensure your budget is spent on high-quality placements that align with your brand.
For better cost control, it’s also a good idea to routinely review your Pmax placement, and watch for Made for Advertising (MFA) content. These sites exist purely for ad arbitrage, and typically feature low-quality content like clickbait headlines, AI-generated filler, and networks of interlinked websites.
Made for Advertising content will inflate your impression volume (without creating impact), dilute your cost metrics, and waste valuable advertising budget. Lunio.io has created a free list of junk domains you can add to all your Pmax campaigns, check it out here.
Children’s YouTube channels and mobile apps are also easy targets for exclusions, since they often lead to accidental clicks from kids with little chance of conversion. These placements are typically unprofitable for most advertisers, and can usually be excluded across most accounts to improve efficiency.
 Tools > Content suitability > Advanced settings
#Negatives
Since Pmax launched, one of its key challenges has been the difficulty of adding negative keywords. Advertisers could only add them at the account level, and campaign-specific negatives required going through a Google rep or support.
Many advertisers have called for the ability to add campaign level negatives, and at first Google responded with their brand exclusion feature, which didn’t quite satisfy the need to exclude non-brand traffic.
Finally Google launched a beta, which enables you to add negatives to your Pmax at campaign level - this is being rolled out to general availability during 2025.
If you do not yet have access to this, you can request it through your Google rep, or go the tried and tested route of contacting support to get a negative list added to your Pmax campaign.
Once you’ve had a negative list added to your campaign, you can continue to edit and add to the list, without the need to contact support again.
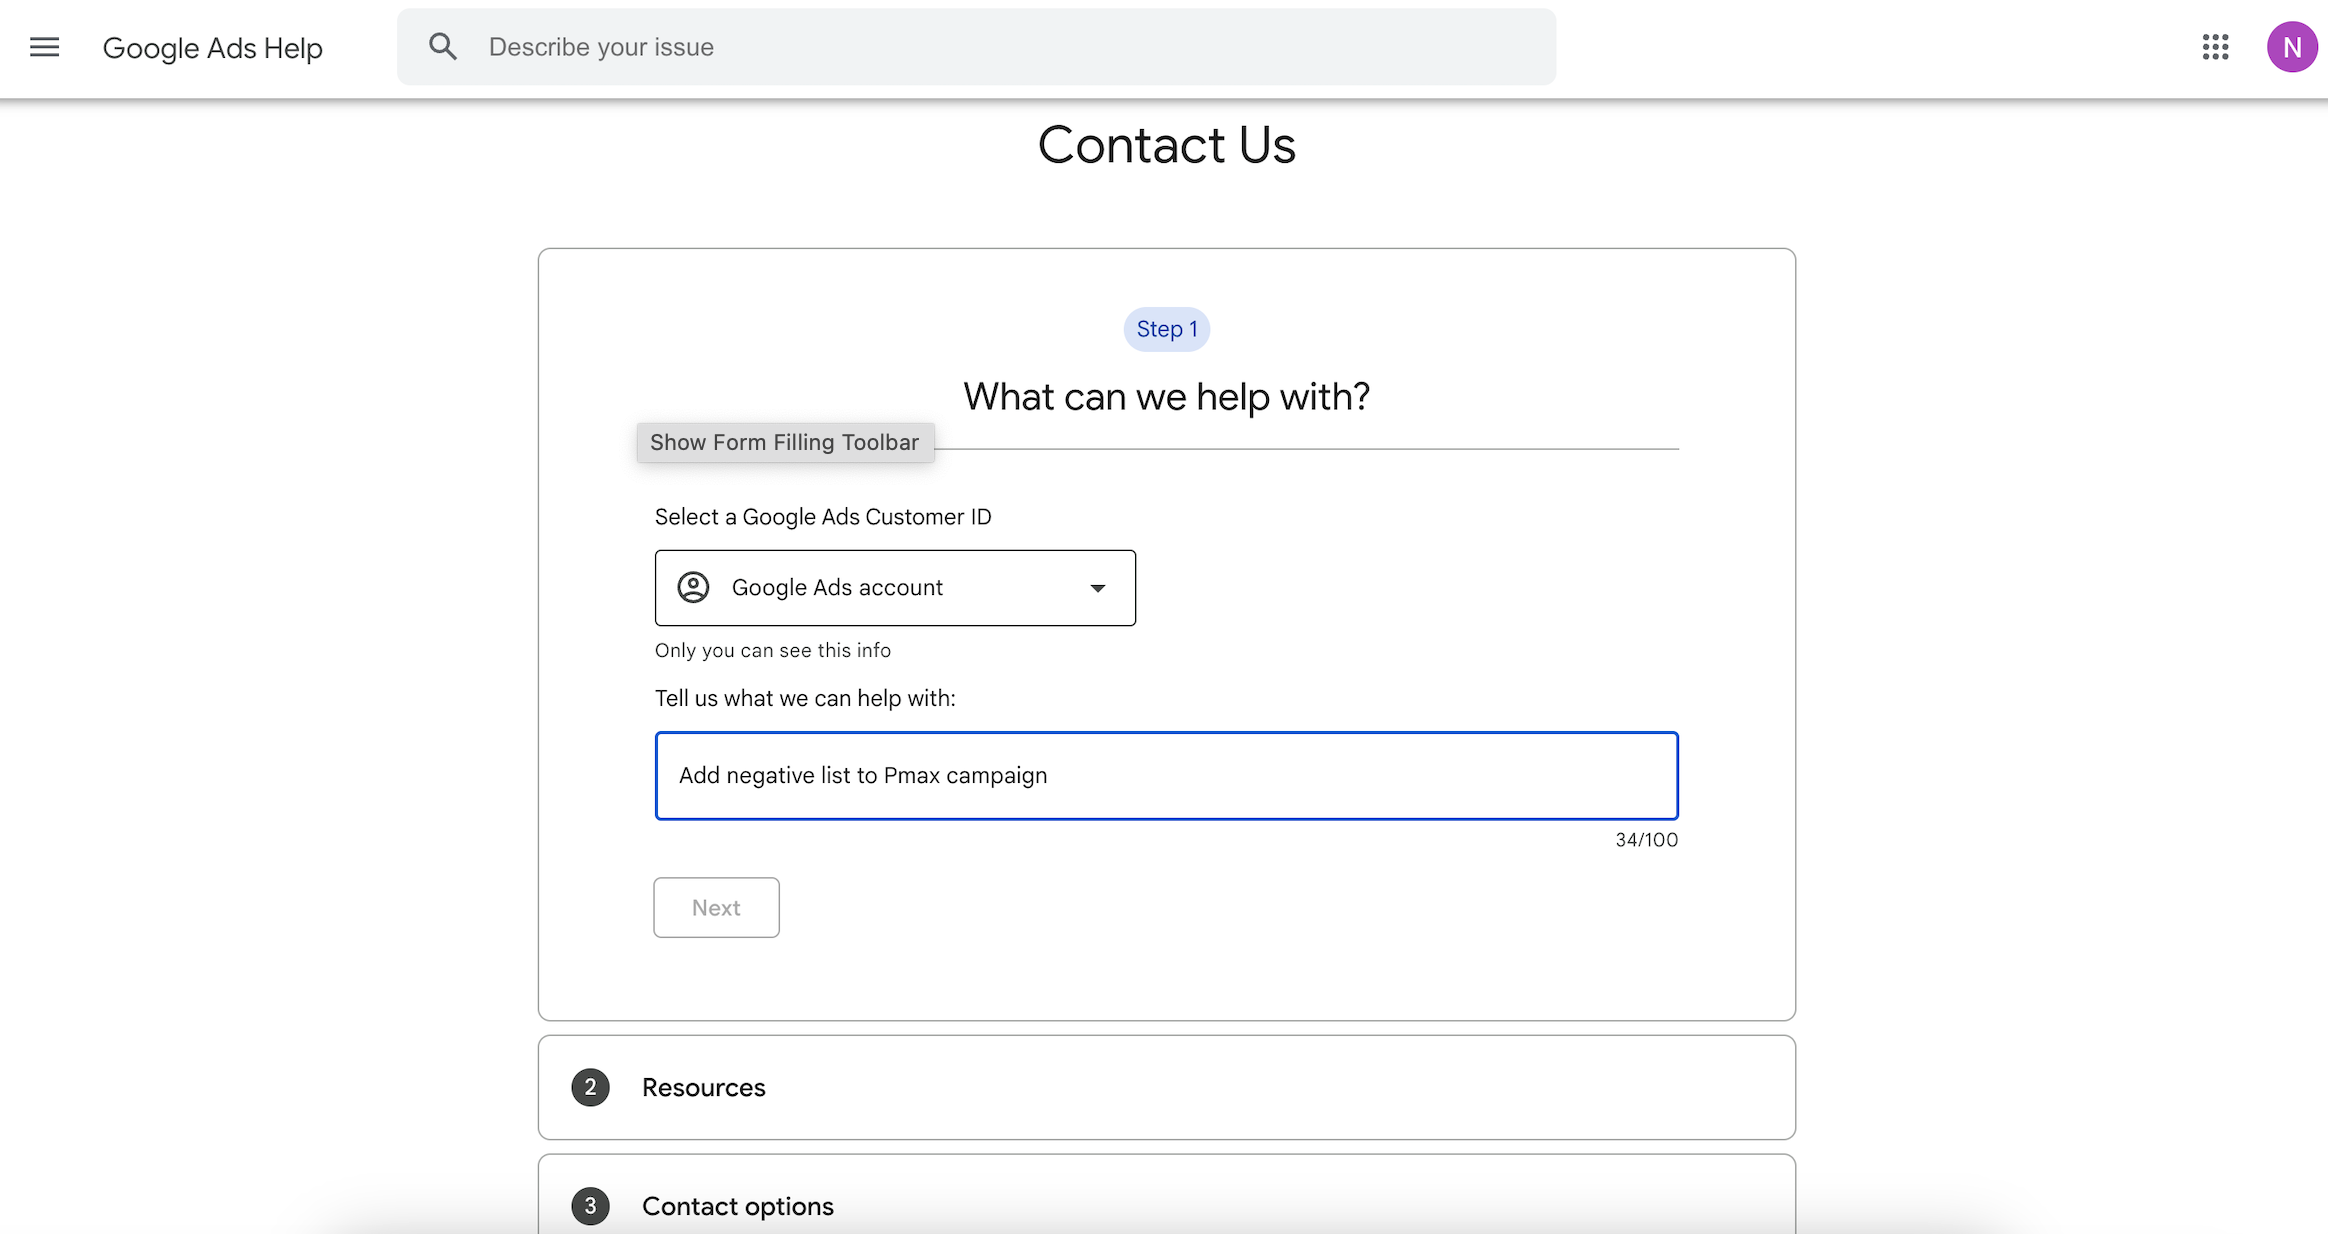 Use Google Ads Help contact form to request having a negative list added to your Pmax campaign https://support.google.com/google-ads/gethelp
 Some negatives can be preemptively excluded based on common sense, and your experience with previous campaigns in the account. Others can be identified by performing n-gram analysis of your campaign’s search terms, identifying underperforming n-grams which can be added as negatives.
To find your Pmax search terms navigate to ‘campaigns’ > ‘insights’ > ‘search terms insights’ > ‘view detailed report’ and add a filter for the campaign(s) you’d like to see.
Google doesn’t provide the cost for Pmax search terms yet, so to evaluate performance, the conversion:impression ratio is the best indicator of a search term’s performance.
Since Pmax continuously matches on new search terms, it is best practice to regularly analyse the search terms it matches on. This is is a time consuming exercise, and often not viable to do routinely, so you might use third party tools to speed up the process.
Opteo’s N-Gram Finder analyses search terms in your account, compares their performance to the average, estimates monthly savings and allows you to add search terms as negatives keywords directly from the tool.
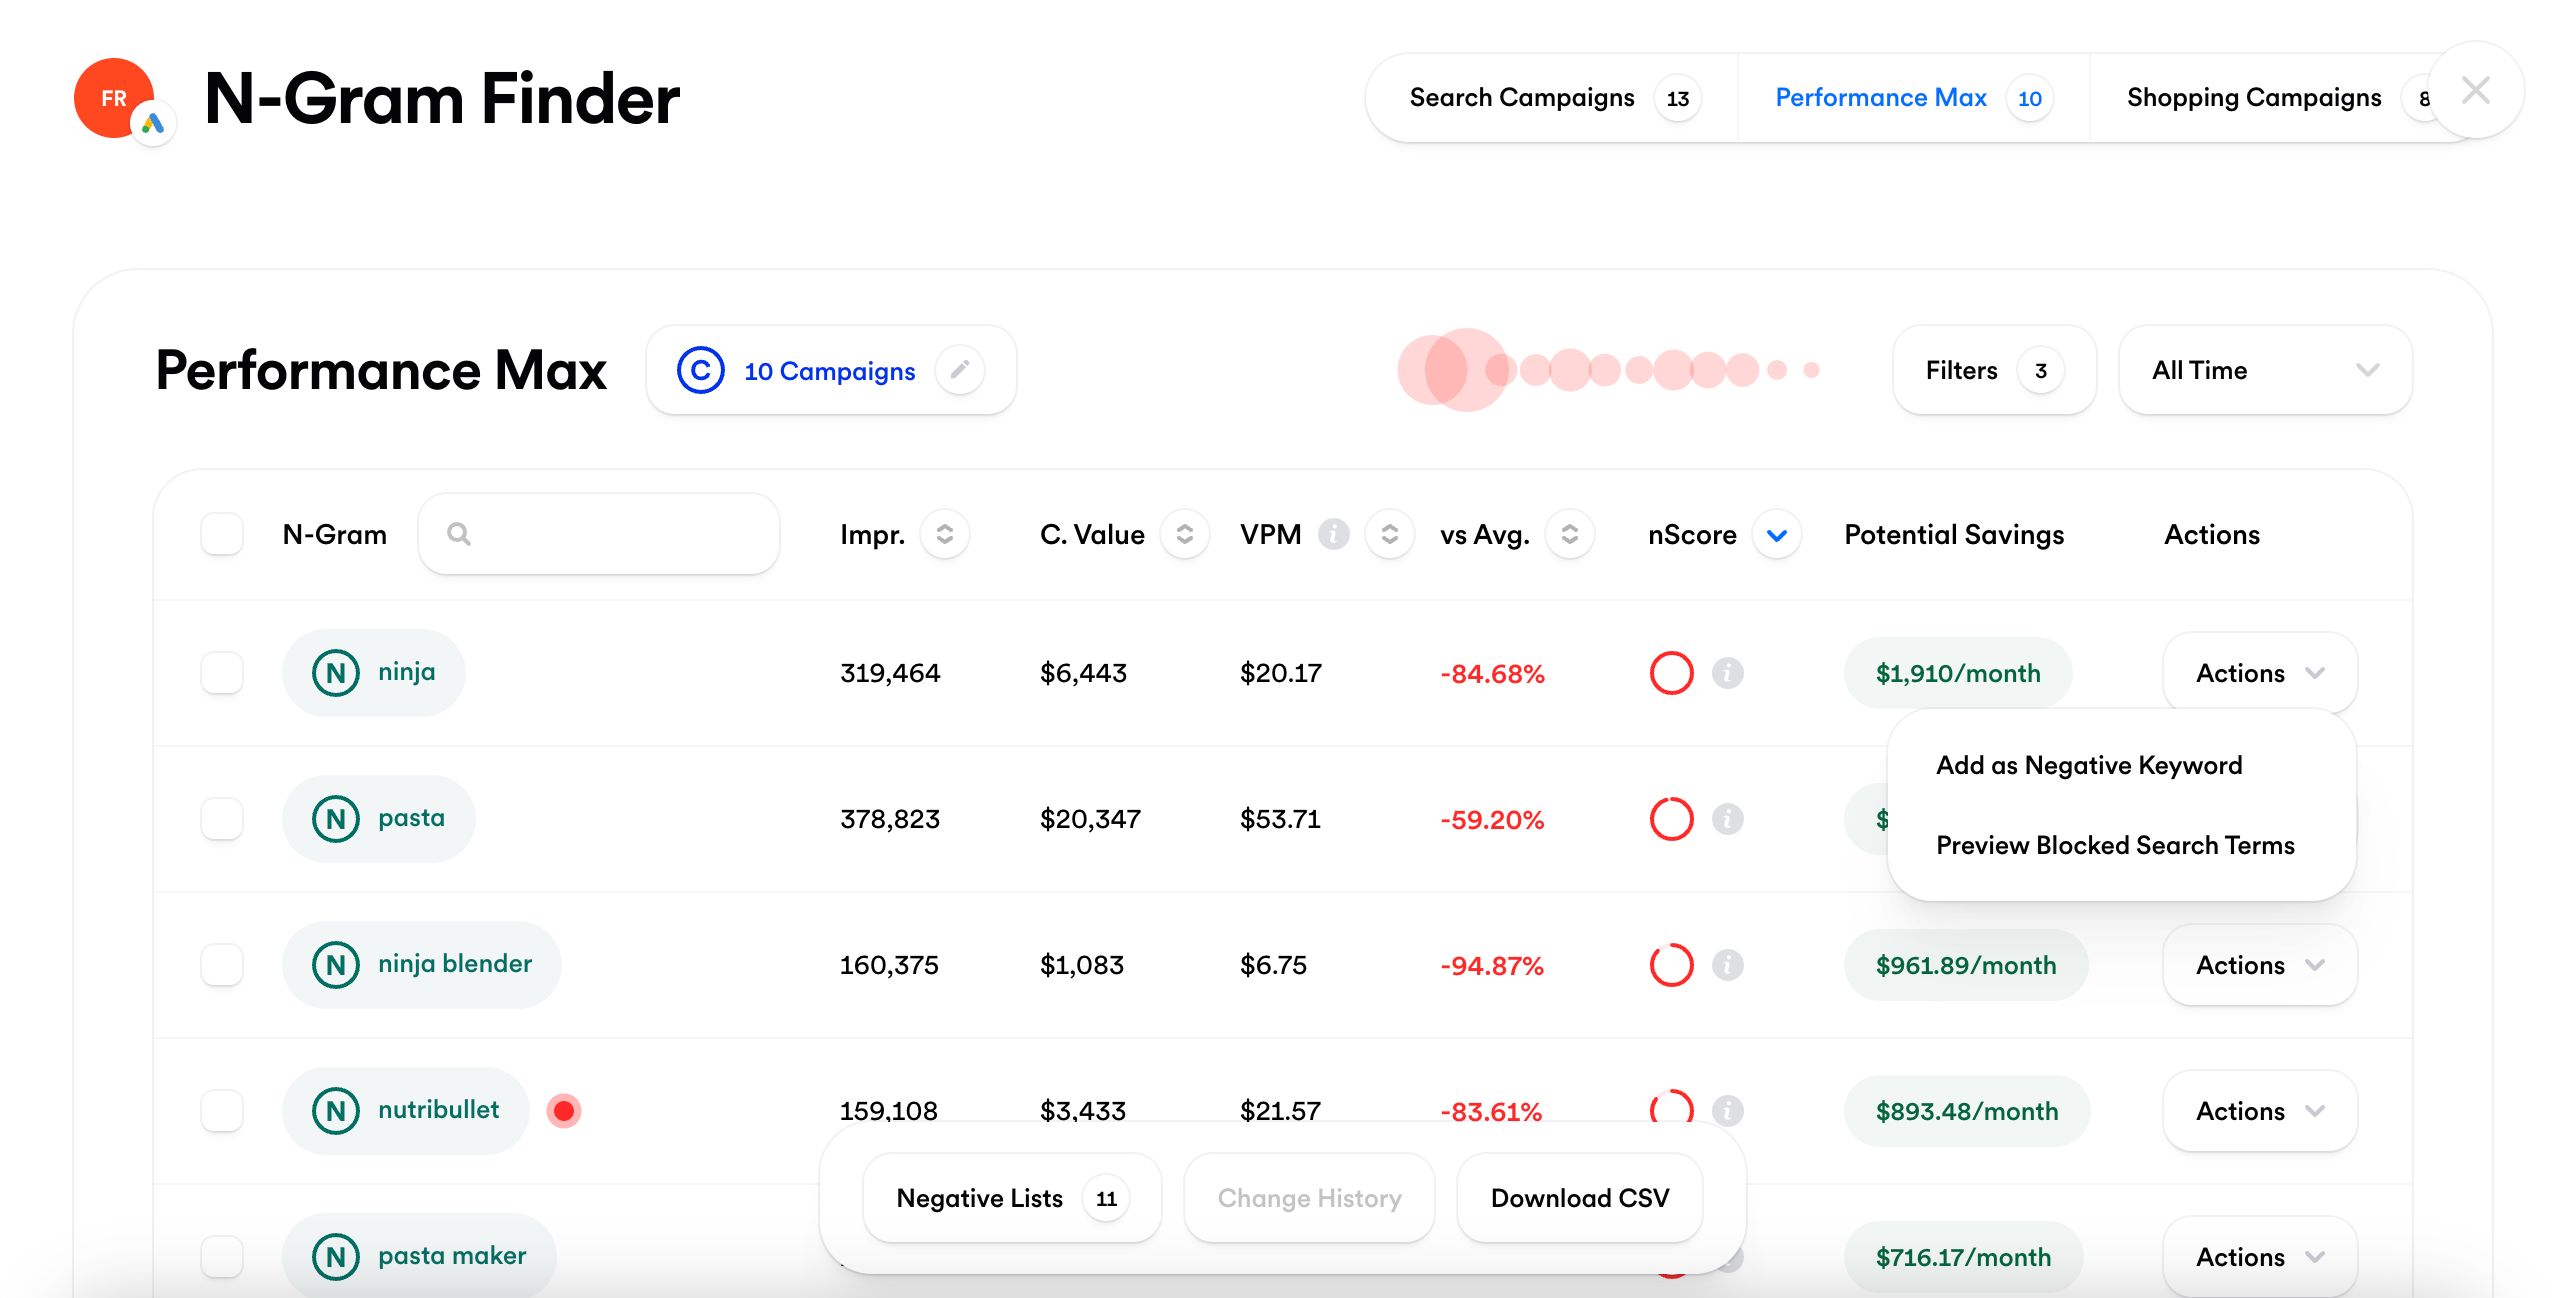 Opteo's N-Gram Finder saves you time by continuously analysing your account's n-grams
#Avoiding cannibalisation
One of Pmax’s biggest strengths is its ability to find customers beyond your specific targeting. However, by design, it is also prone to cannibalising other campaign types.
To get the most out of Pmax, it’s important to steer it away from the users you are targeting in other campaigns, and nudge it towards finding customers beyond your usual, more prescriptive audiences.
#Exclude branded traffic
Branded traffic is often cheap, so to avoid the algorithm using it as a shortcut to meet your targets, it's a good idea to exclude your brand terms.
Pmax has a native function for excluding branded traffic. According to Google, this feature also catches misspellings and queries in other languages. The brand exclusion feature has it’s limitations, and will only exclude branded traffic on search and shopping.
If you want to exclude branded search terms on YouTube as well, you are better off using a negative keyword list (or both). If you opt for a negative keyword list, make sure to include all misspellings and variants of your brand name.
If you go for the brand exclusion feature, you’ll find this in campaign settings > 'additional settings' > 'brand exclusions'. Here you can add existing brands from Google’s brand library — if your brand does not exist yet you’ll need to request Google to create it.
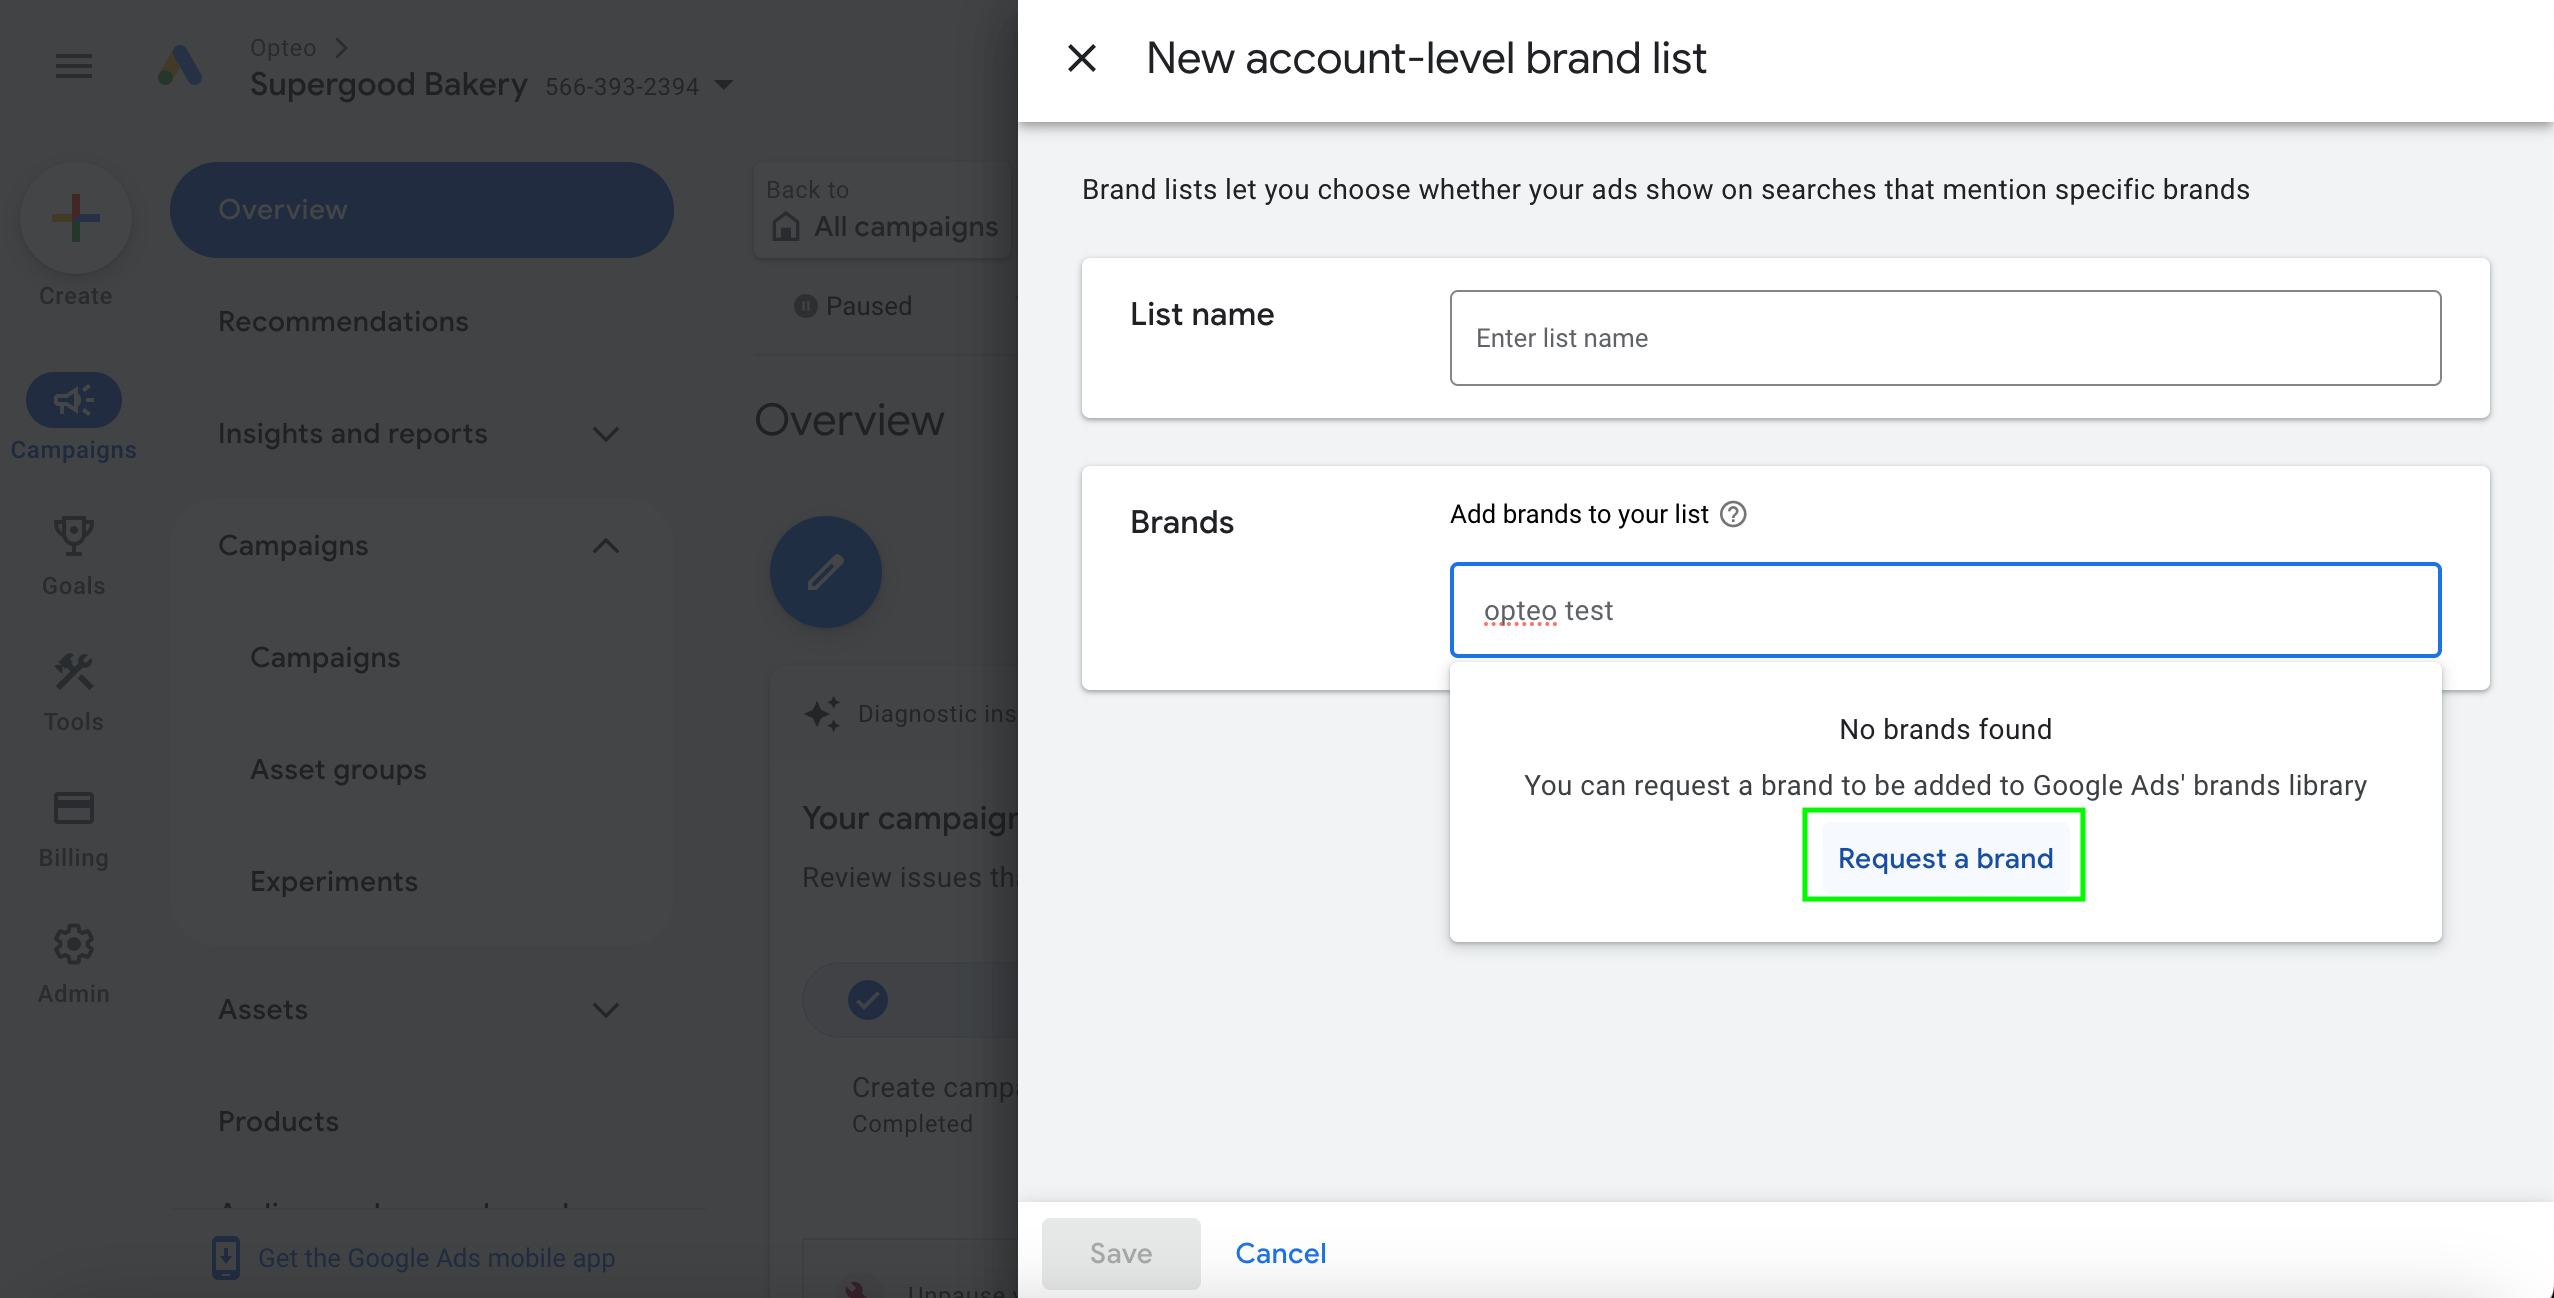 Request the creation of your if it doesn't yet exist in Google's library.
The brand approval process takes 4-6 weeks. If Google approves the request, the brand will be added to Google’s brand library, allowing any advertiser to exclude it from their campaigns.
While your brand is “under review” it will not be excluded from your campaign. In the meantime, make sure to add the brand term to a negative list, to avoid the Pmax algorithm training on branded traffic.
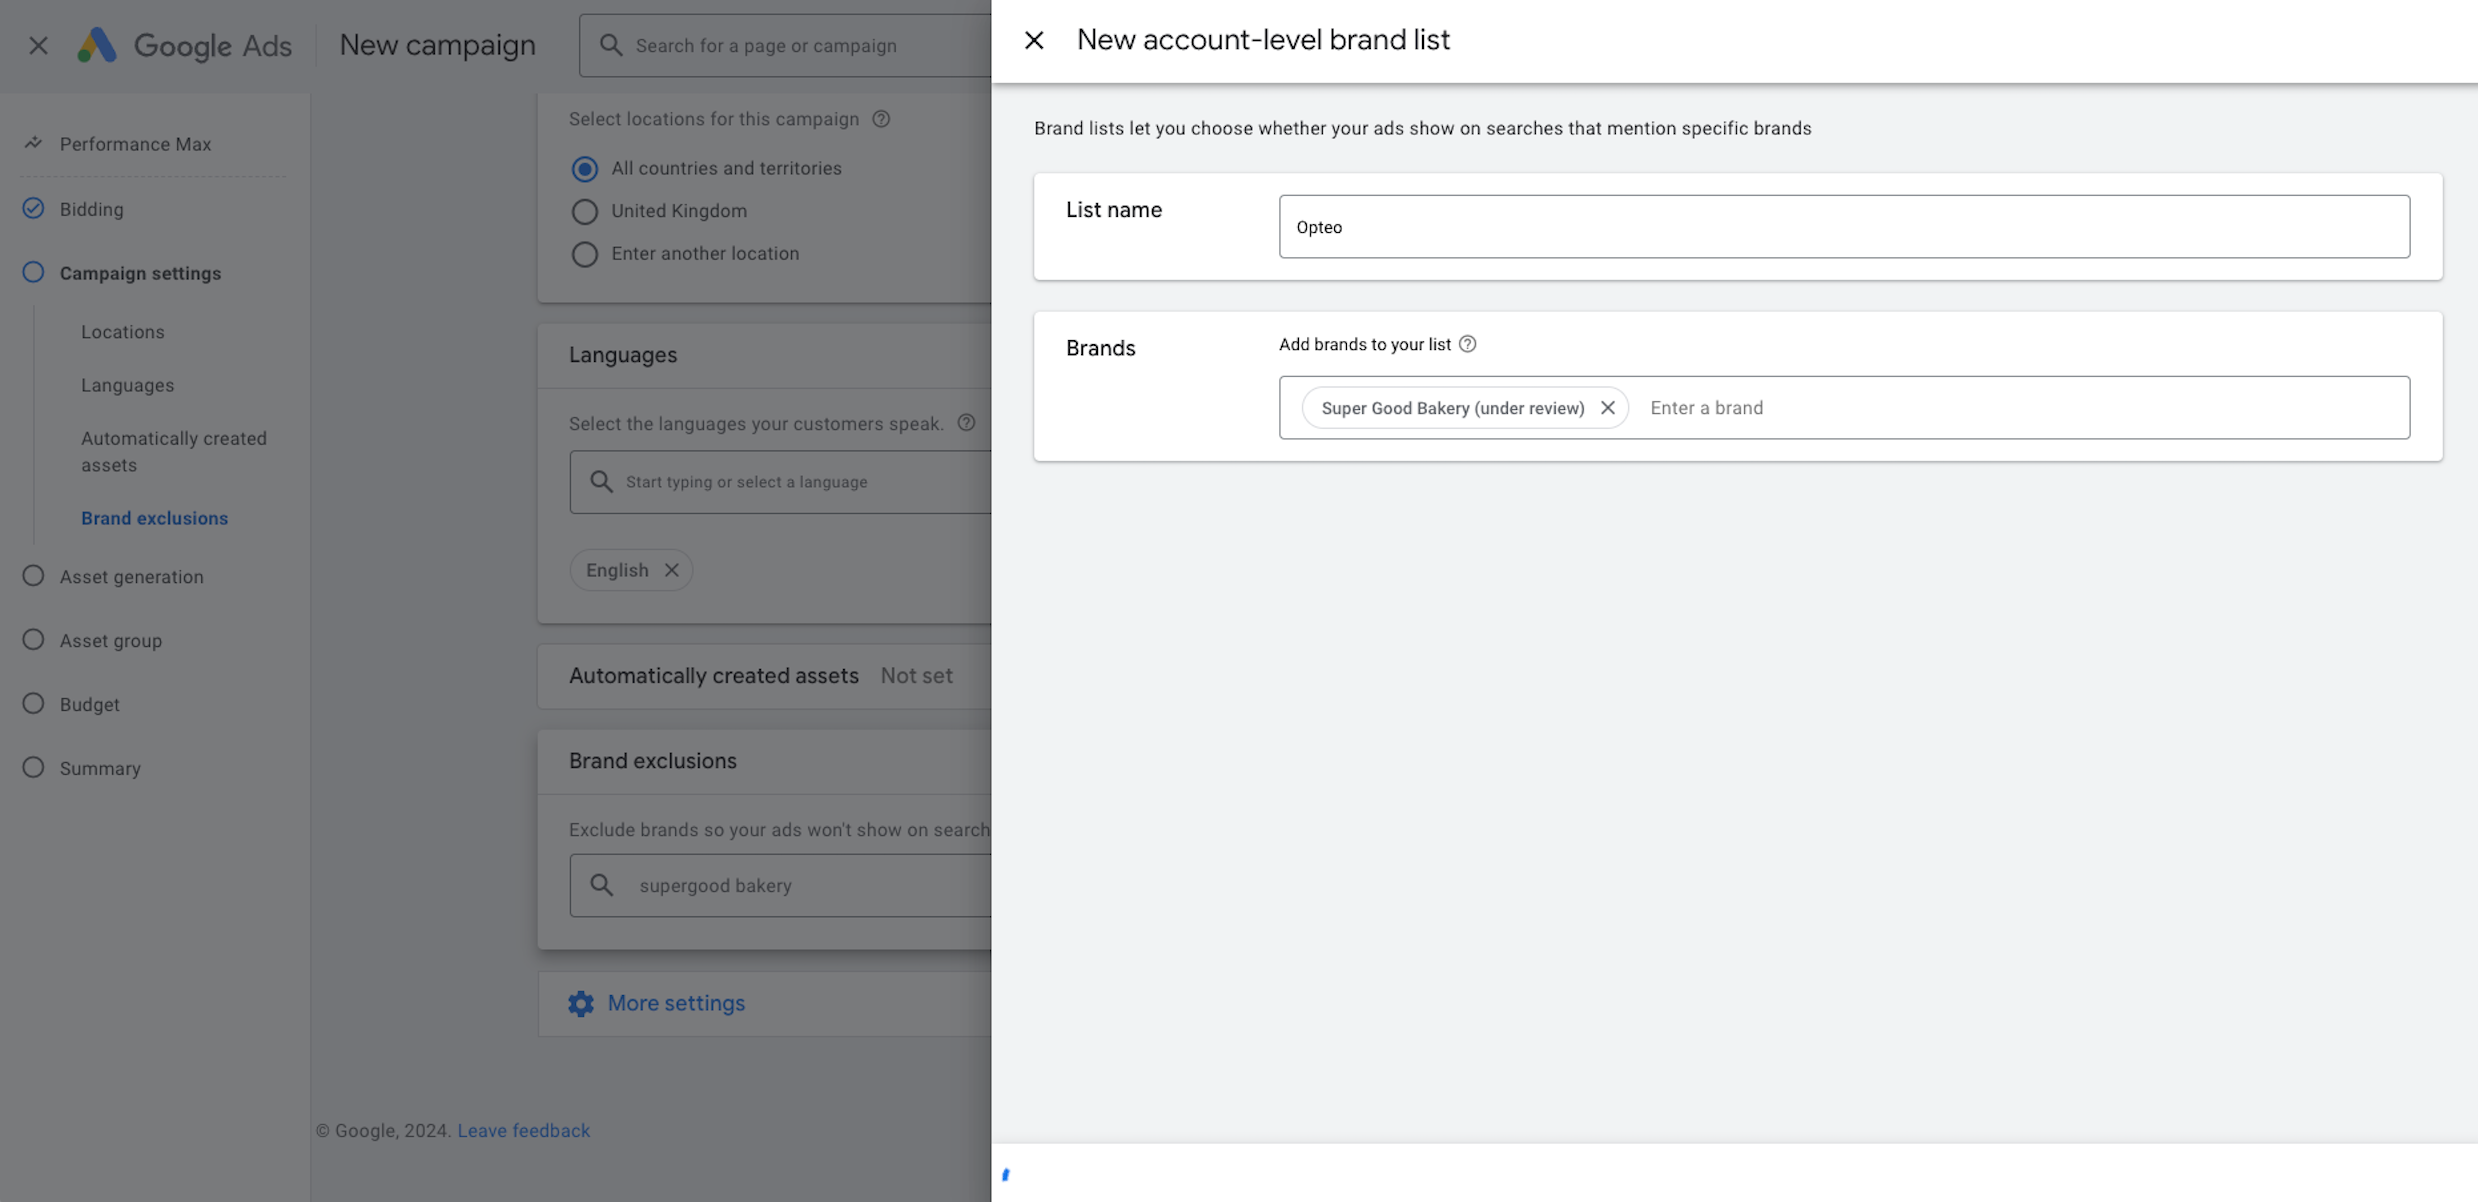 While the brand is under review, brand is not excluded from your campaign.
Branded feed only Pmax campaign
A strategy that has worked well for some advertisers is to exclude brand terms from all Pmax campaigns, except one.
The campaign without the brand exclusion should be a feed only campaign, so you only get traffic on shopping, avoiding cannibalisation of search campaigns.
#Avoid overlapping search themes
Search themes can help a new campaign learn faster by guiding the algorithm towards your known audiences — users who search for terms related to your products or services.
However, this also has a downside. By steering the algorithm towards known audiences, it can limit its ability to prospect for new, potentially valuable audiences —one of the great strengths of Pmax.
Additionally, if your search themes overlap or are closely related to your search campaign keywords, you risk Pmax bidding on traffic you’re already receiving through search, which can lead to cannibalisation of your campaigns.
Once your campaign gets going, it can be a good strategy to remove the search themes, to encourage the algorithm to prospect for new audiences. If you do this, remember that whatever learning the algorithm had from the search themes will remain, even after they are removed.
If you want to safeguard further from cannibalisation of search, consider not adding search themes related to your keywords at all.
Pmax is designed to look for users, rather than queries, so consider what type of queries your audience might be looking up, and add these as search themes. This way you can differentiate them from your search keywords.
Use exact match on search for high performing keywords
A strategy for safeguarding your top performing keywords, is to make sure you have them all in exact match, since exact match keywords on search take priority over Pmax search themes.
If you mainly work with other match types, consider creating a separate campaign exclusively for your top performers:
- Identify your top performing keywords
- Create a new search campaign
- Add your top performers as exact match
#Hidden features
Google Ads in general, but Pmax in particular, is full of hidden features. Many of these are enabled by default, and usually they benefit Google more than you.
These features are often labelled as ‘smart’, ‘enhanced’, ‘expanded’, and sometimes come with a ‘recommended’ label in the Google Ads UI. While they broaden your targeting, they tend to help Google increase revenue without necessarily delivering results that justify the expanded reach.
Individually, these features can be money sinks, but when combined, they become even more problematic, as they allow your campaign to drift outside of your intended strategy.
To run a successful Pmax campaign, it is important to identify and understand these features and, in most cases, routinely disable them to ensure they don’t stray from your strategy.
#Location options
The 'targeting interests by location' setting allows your ads to show to people who have shown interest in your business, even if they're outside your targeted geographic area.
As a rule of thumb, this places 20-30% of the campaign spend outside of your targeted area. For most advertisers this is wasted spend. Unless you are advertising for a hospitality business, turning off this setting is essential for plugging the drain on your Pmax campaign.
Location targeting is set to "location of interest" by default, and this setting cannot be adjusted during the Pmax campaign setup flow in the Google Ads UI. However, you can change it in Google Ads Editor.
If you set up your campaign from Google Ads UI, you’ll need to come back into the settings after finishing the campaign setup, and change it.
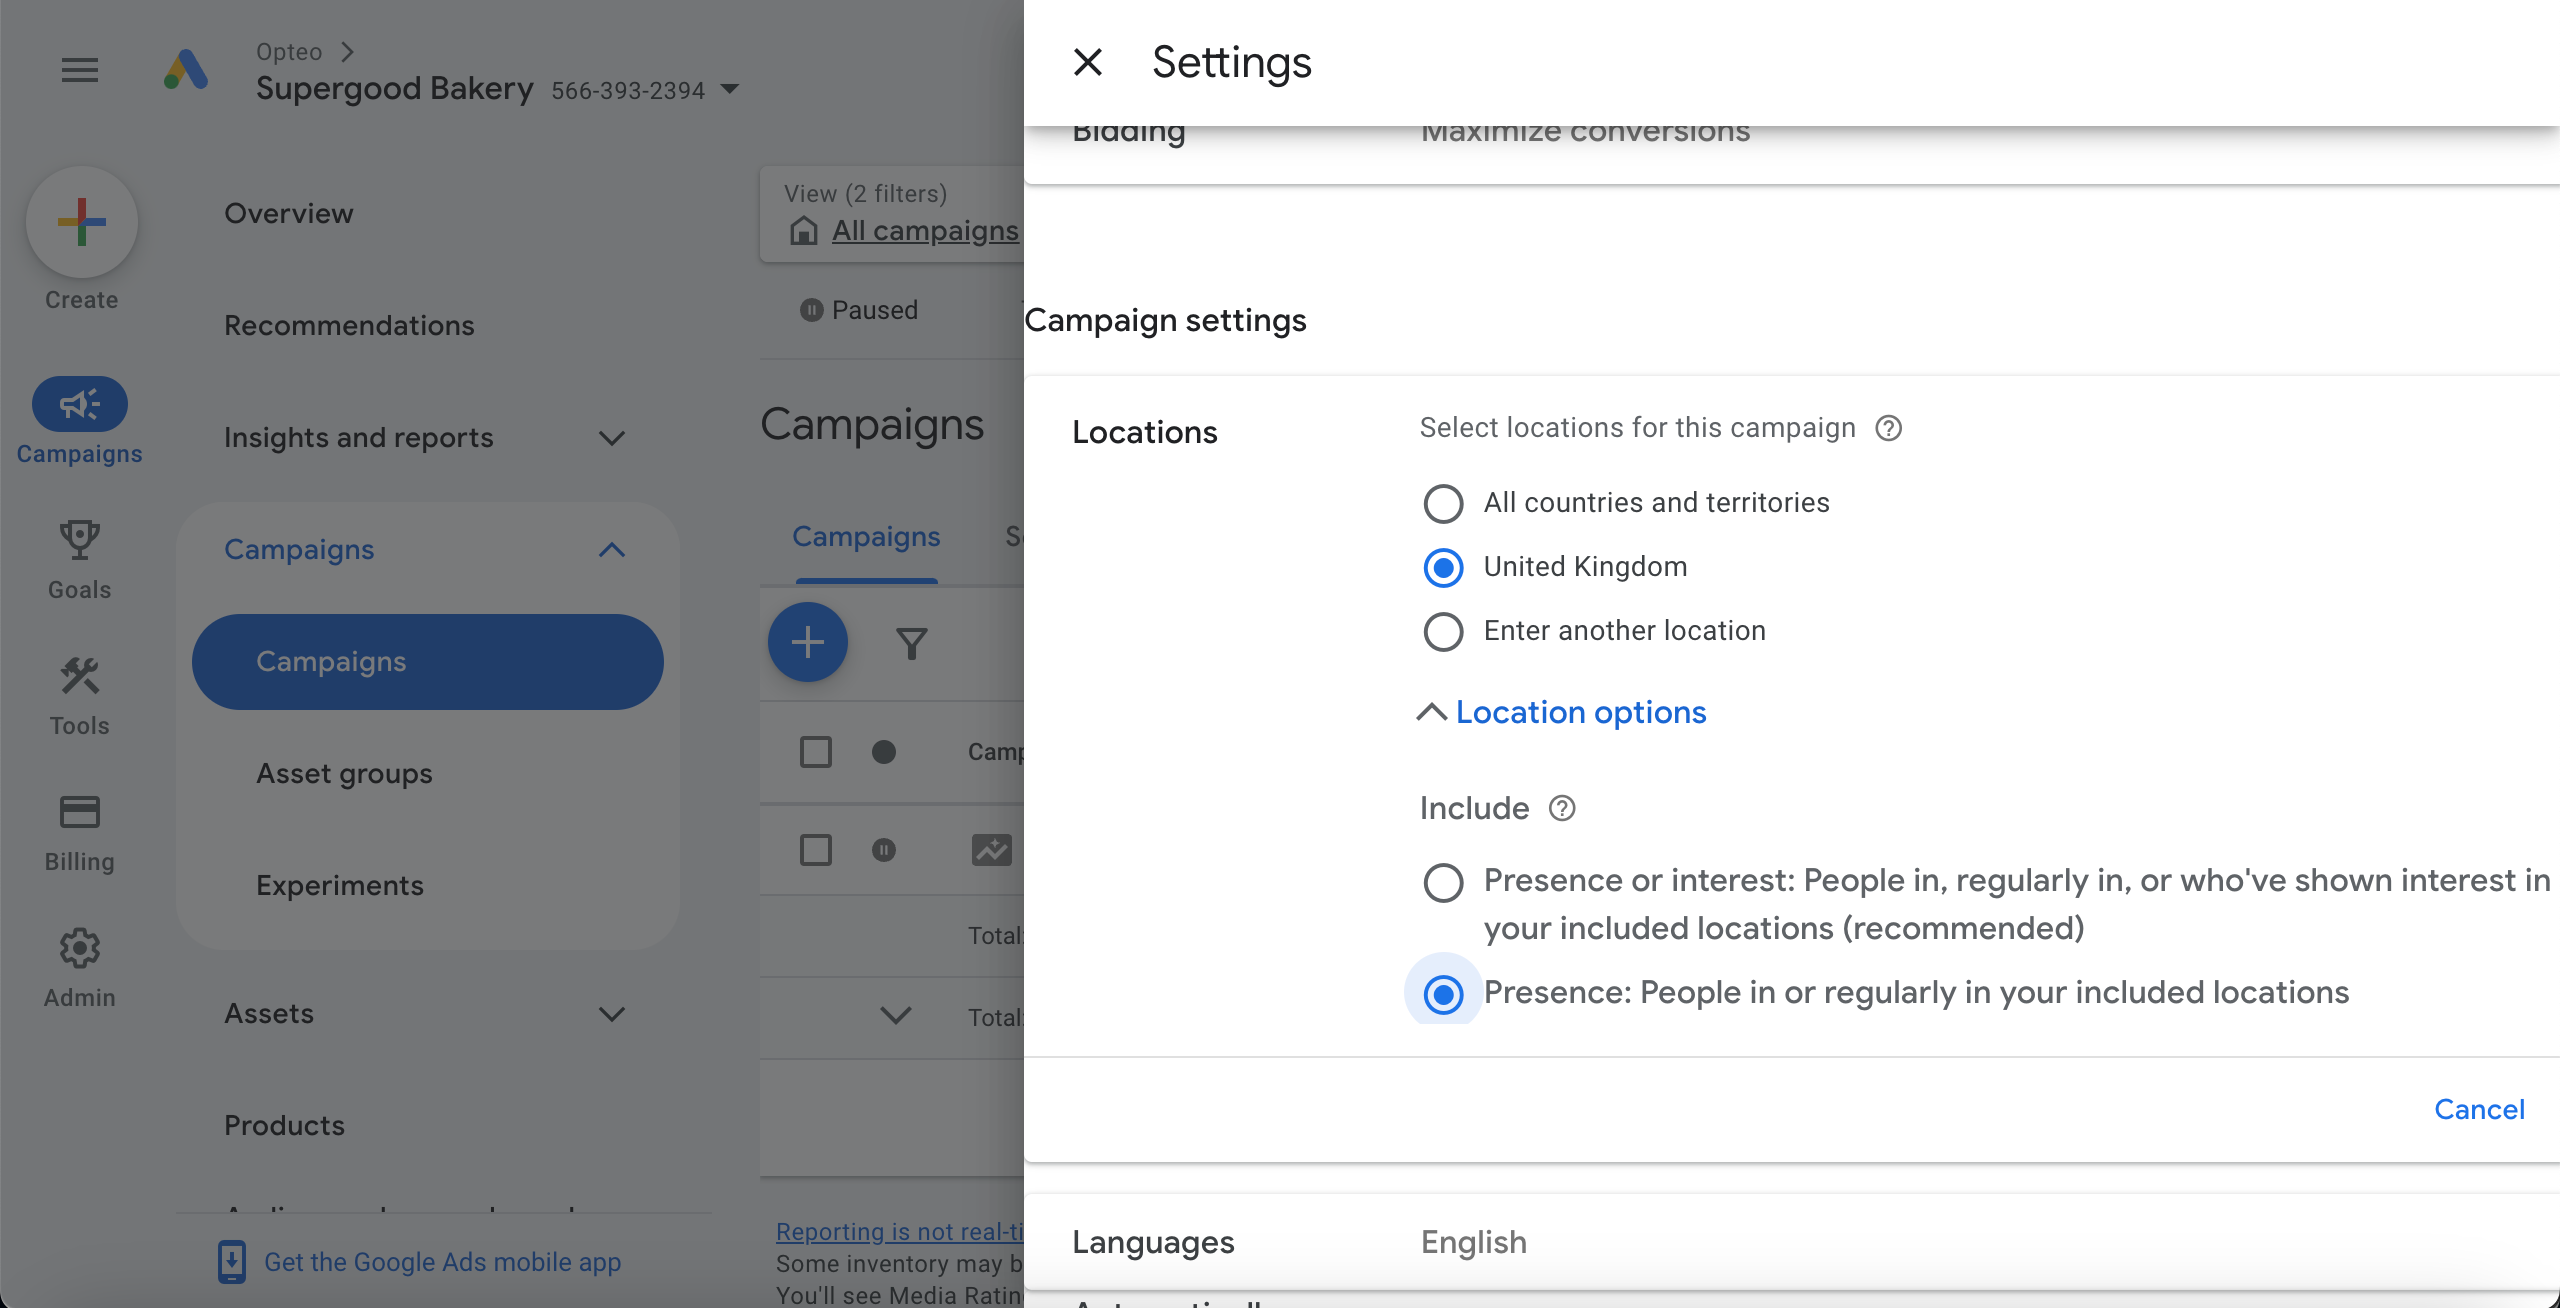 To adjust the location targeting, go to your ‘campaign settings’ > ‘locations’ > ‘location options’ and select ‘Presence: People in or regularly in your included locations’.
#Auto generated text assets ‘customization’
Turning on ‘customization’ under automatically created assets, will allow Google to automatically spin up headlines and descriptions, tailored to specific queries. While this sounds useful, it is yet another way important decisions are relinquished to the algorithm.
The first concern about auto generated text assets is quality and brand suitability. While AI can be a great way to get inspiration for text creatives, having a human review the copy is always recommended. With Pmax’ auto generated text assets, you don’t have any control over the content.
It’s best practice to have a deliberate strategy that creates coherence between products, targeting, and messaging within your asset groups. Adding automated text assets can muddy the messaging, as angles or messaging that work well for one asset group may get mixed with others, leading to less effective results.
If you're running a feed only campaign, the disruption to your strategy is even more significant. The campaign will effectively function as a DSA (Dynamic Search Ads) campaign, potentially diverting a large portion of its budget from Shopping to Search.
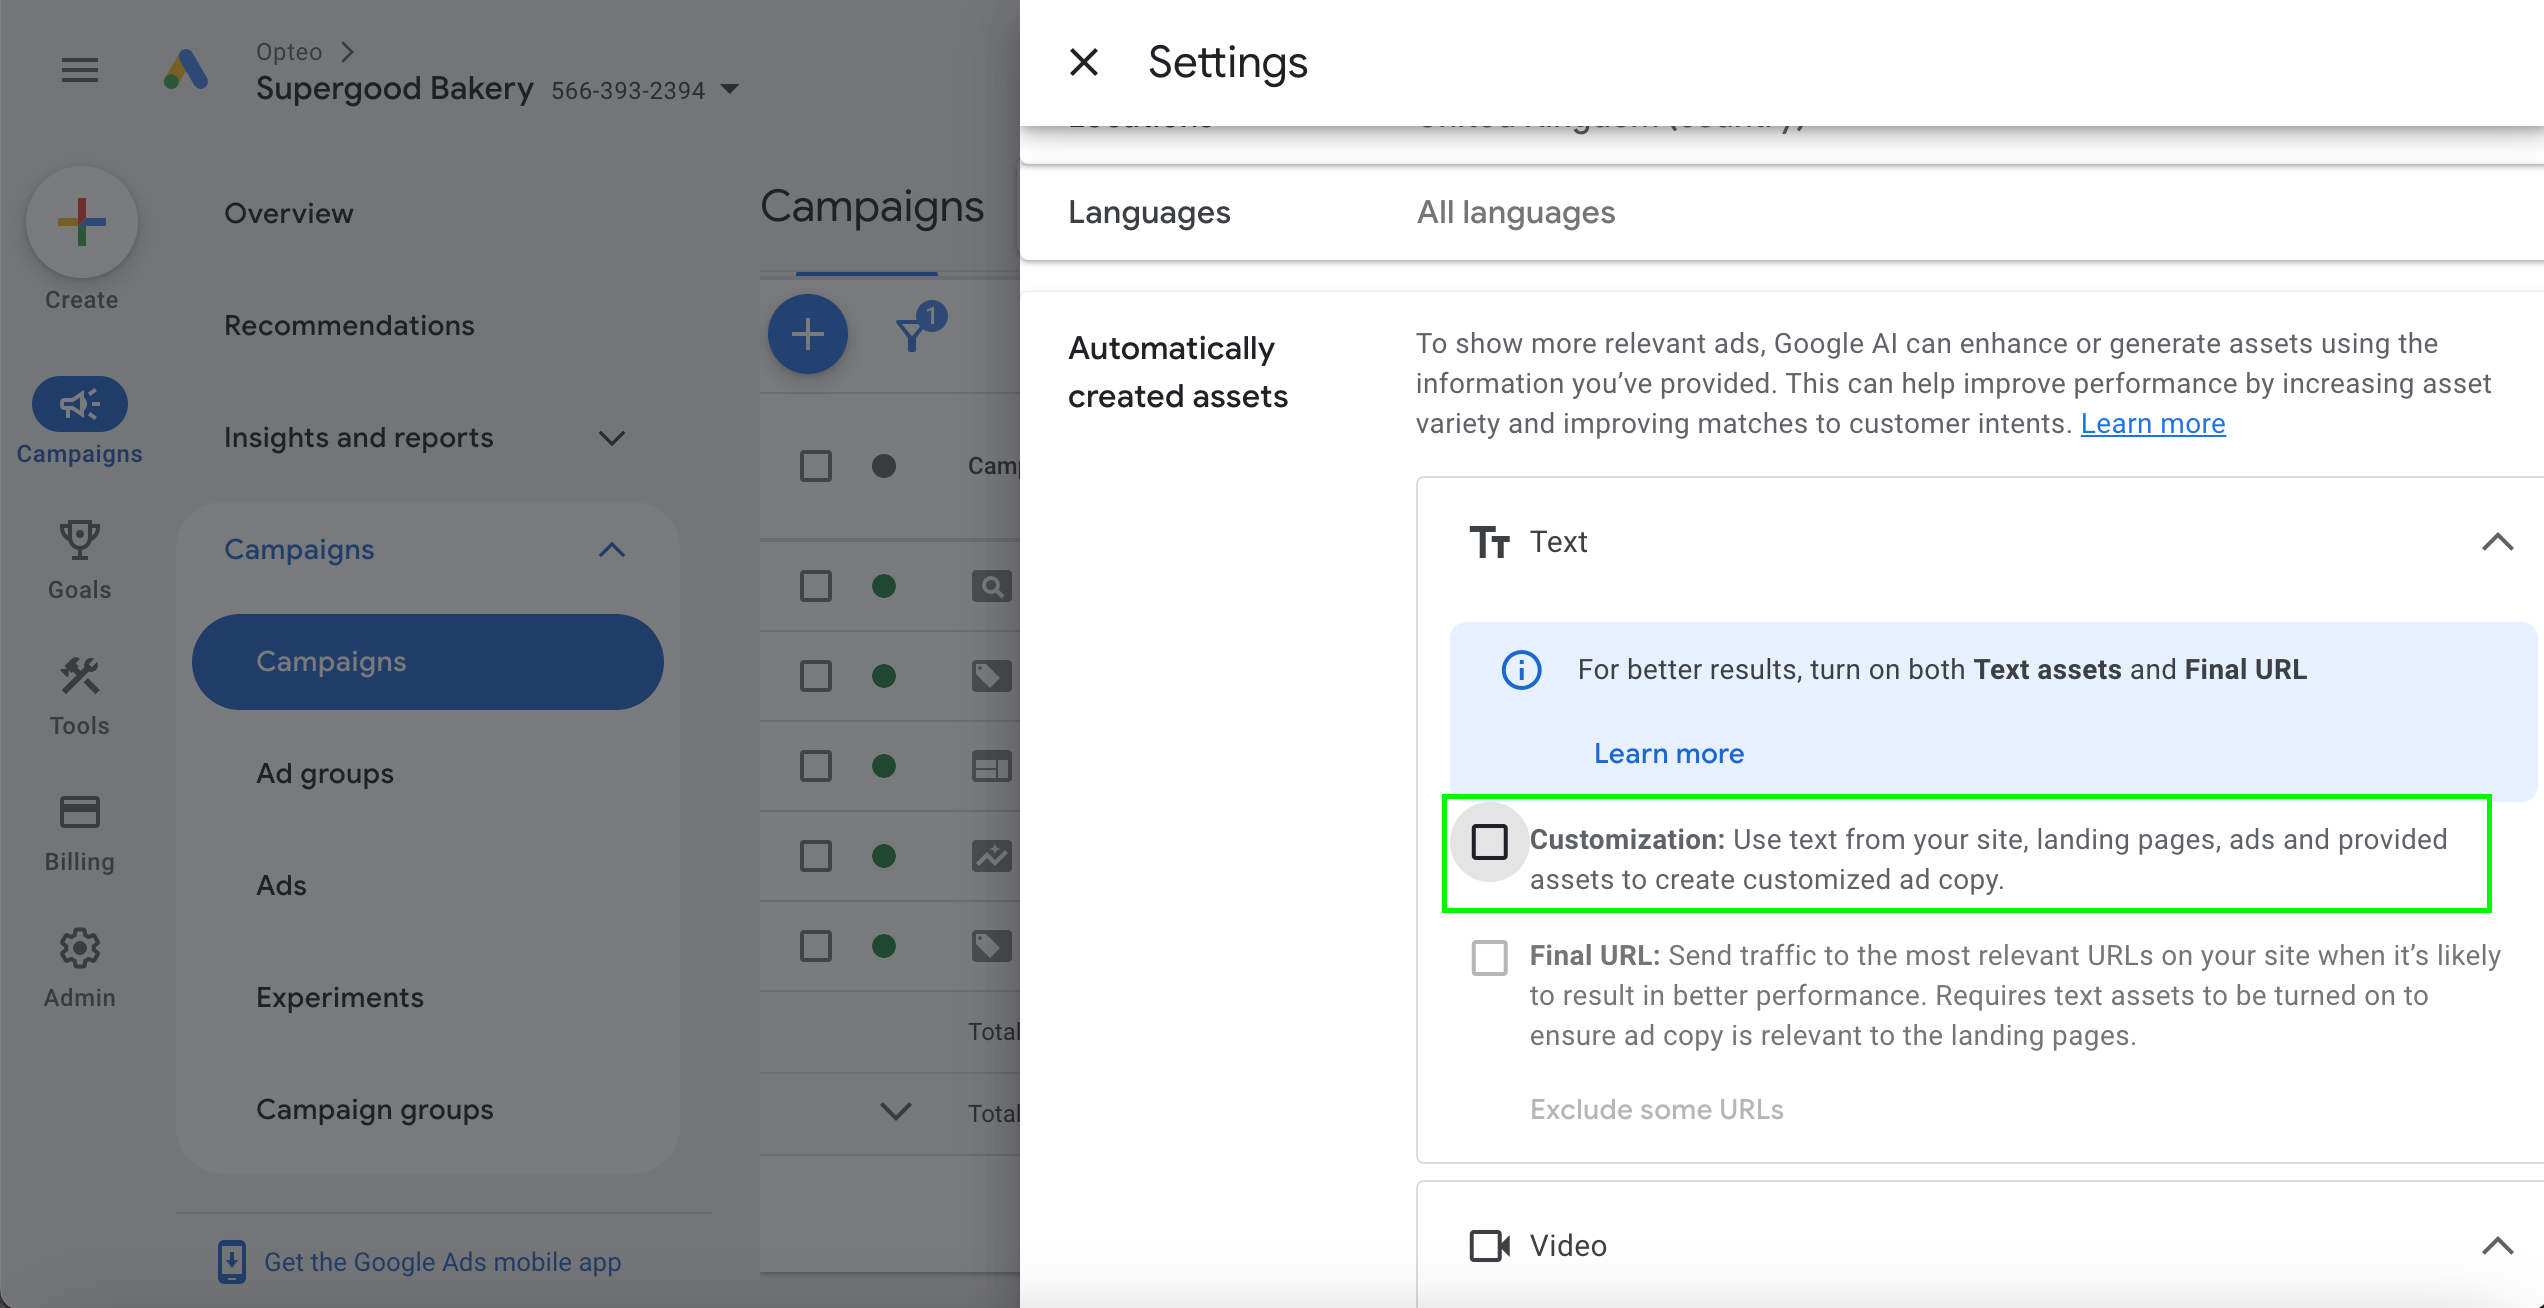 Named 'customization' this feature auto generates text assets for your ads.
 #Final URL expansion
Final URL expansion is enabled by default, and only works when text asset customization is turned on. If you leave it turned on, Google can push all of your landing pages and, with auto-generated text ads, your campaign might end up spending more on search. It also creates site links, callouts, and ad headlines, which can shift your campaign’s focus away from your intended strategy.
This gives a lot of control to the algorithm, and in most cases, it's better to manually select the landing pages and products you want your campaign to focus on.
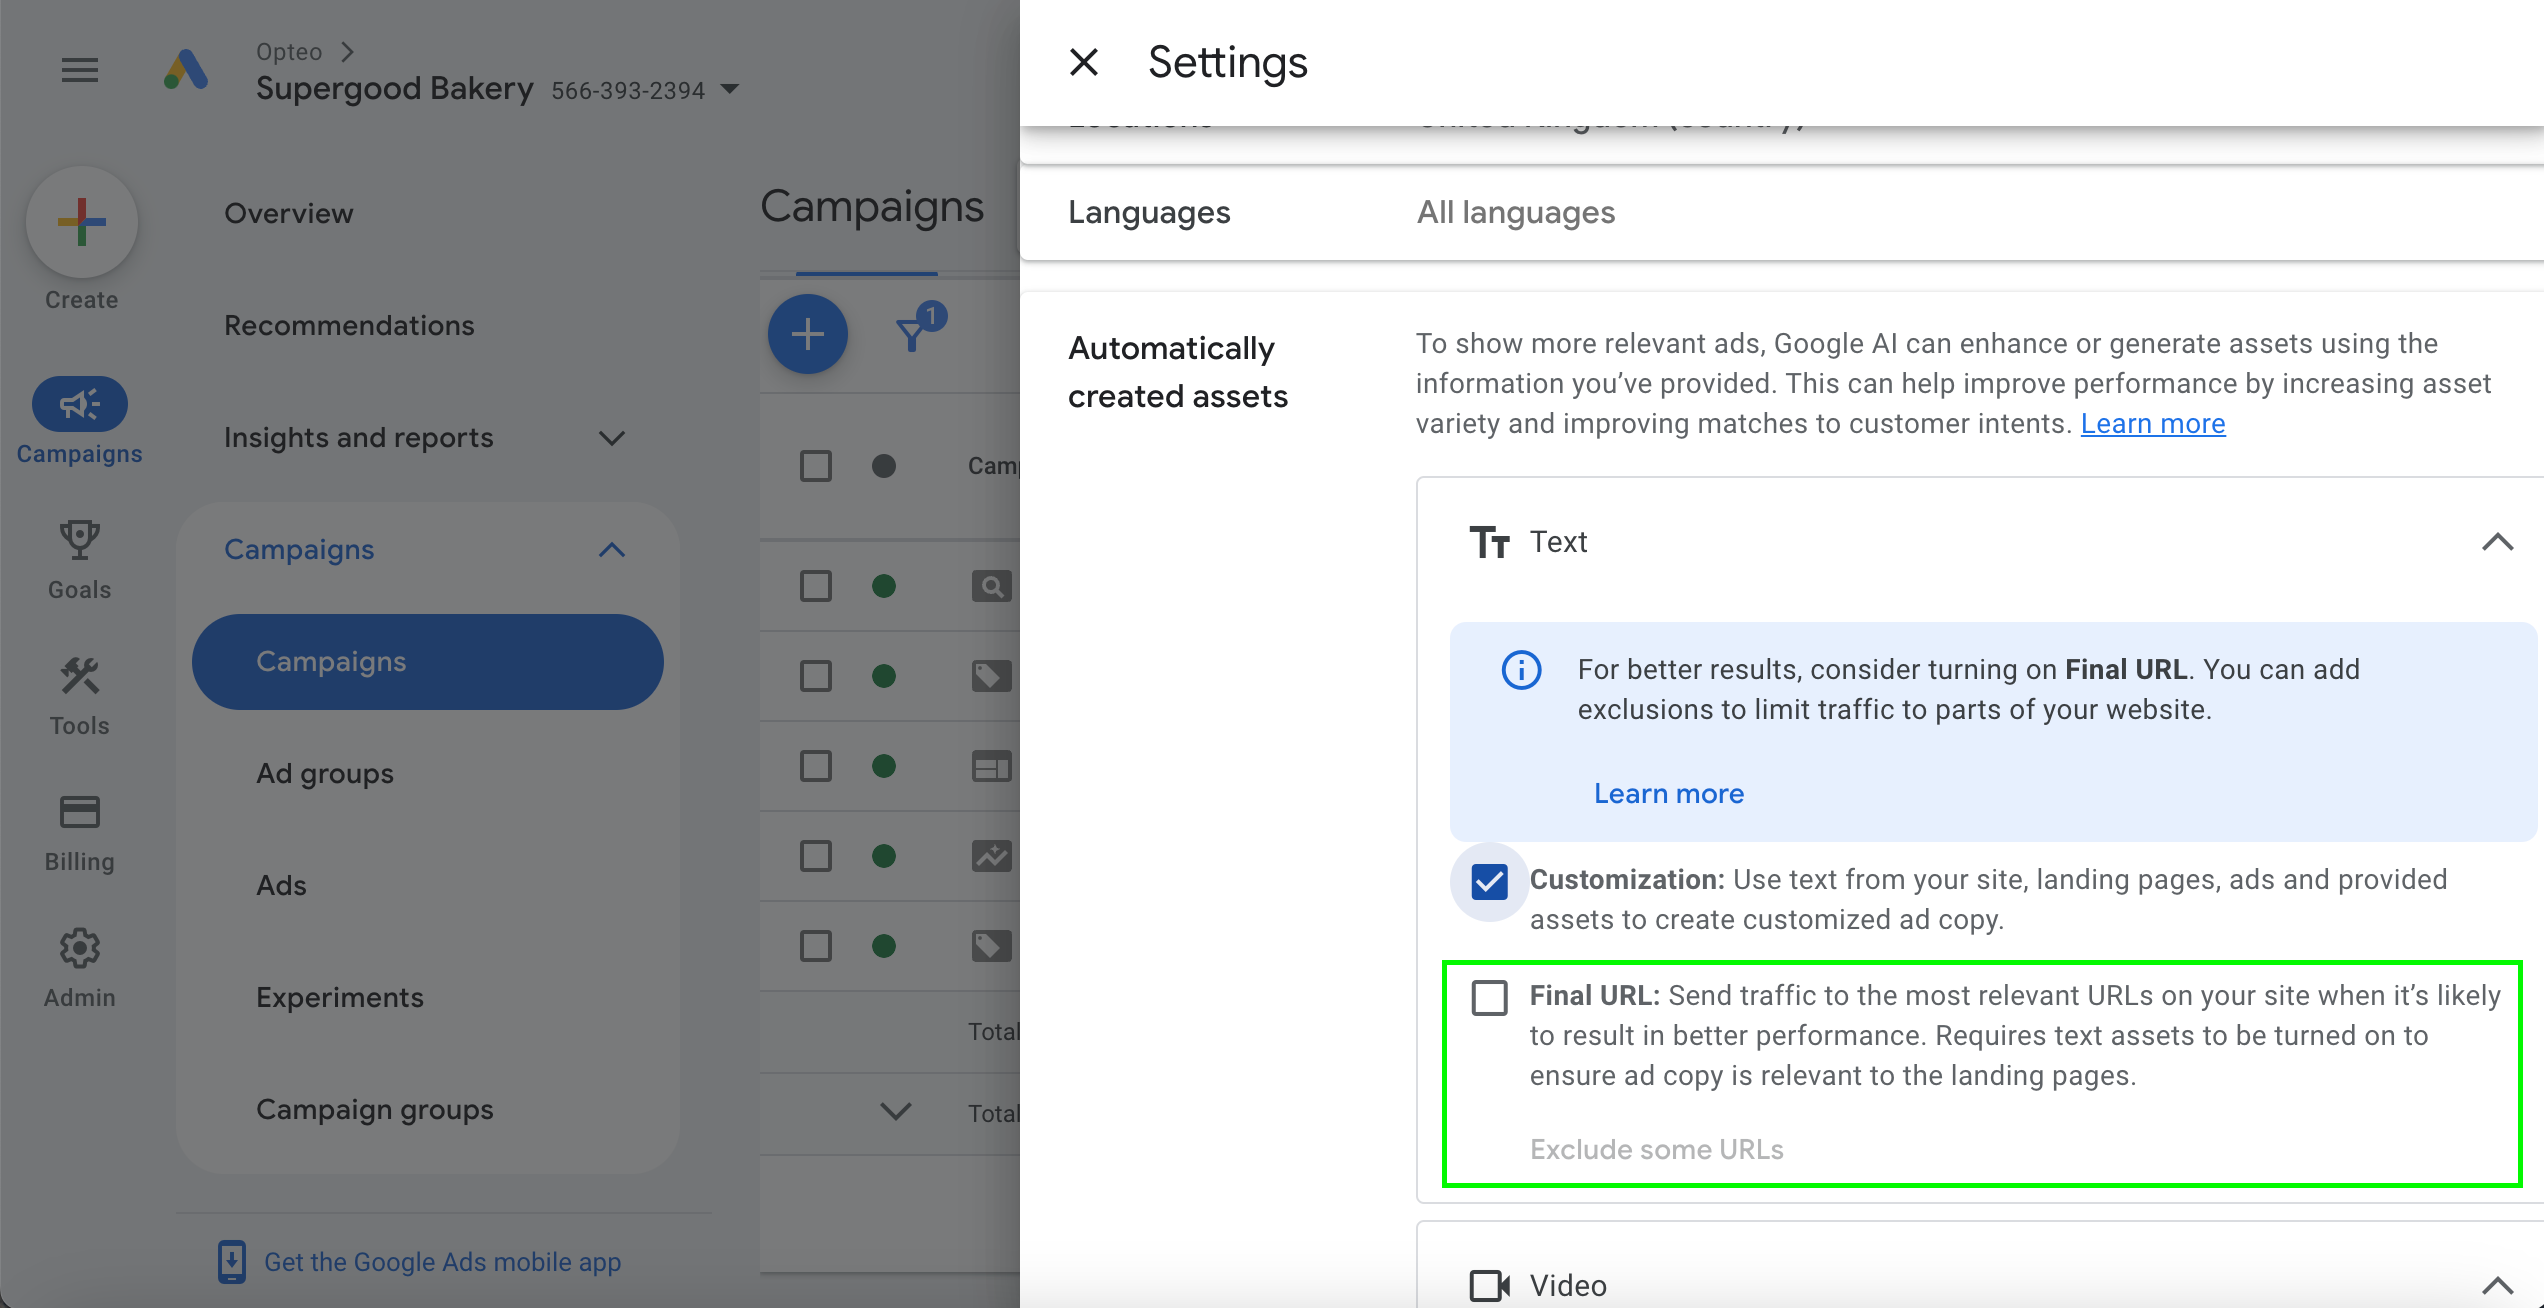 Campaigns > 'settings' > 'automatically created assets' > 'Final URL'
#Video enhancement
The video enhancement feature is also enabled by default, and lets Google create alternative versions of your video (such as vertical square videos and shorter versions).
This can be helpful if you have a high-quality video you want to promote. However, if video is a key priority for you, it’s usually better to produce different versions yourself to maintain control over quality and messaging.
The main goal of this feature is to sell more video inventory, so if you want to limit how much video inventory your campaign bids on, it’s best to switch this feature off.
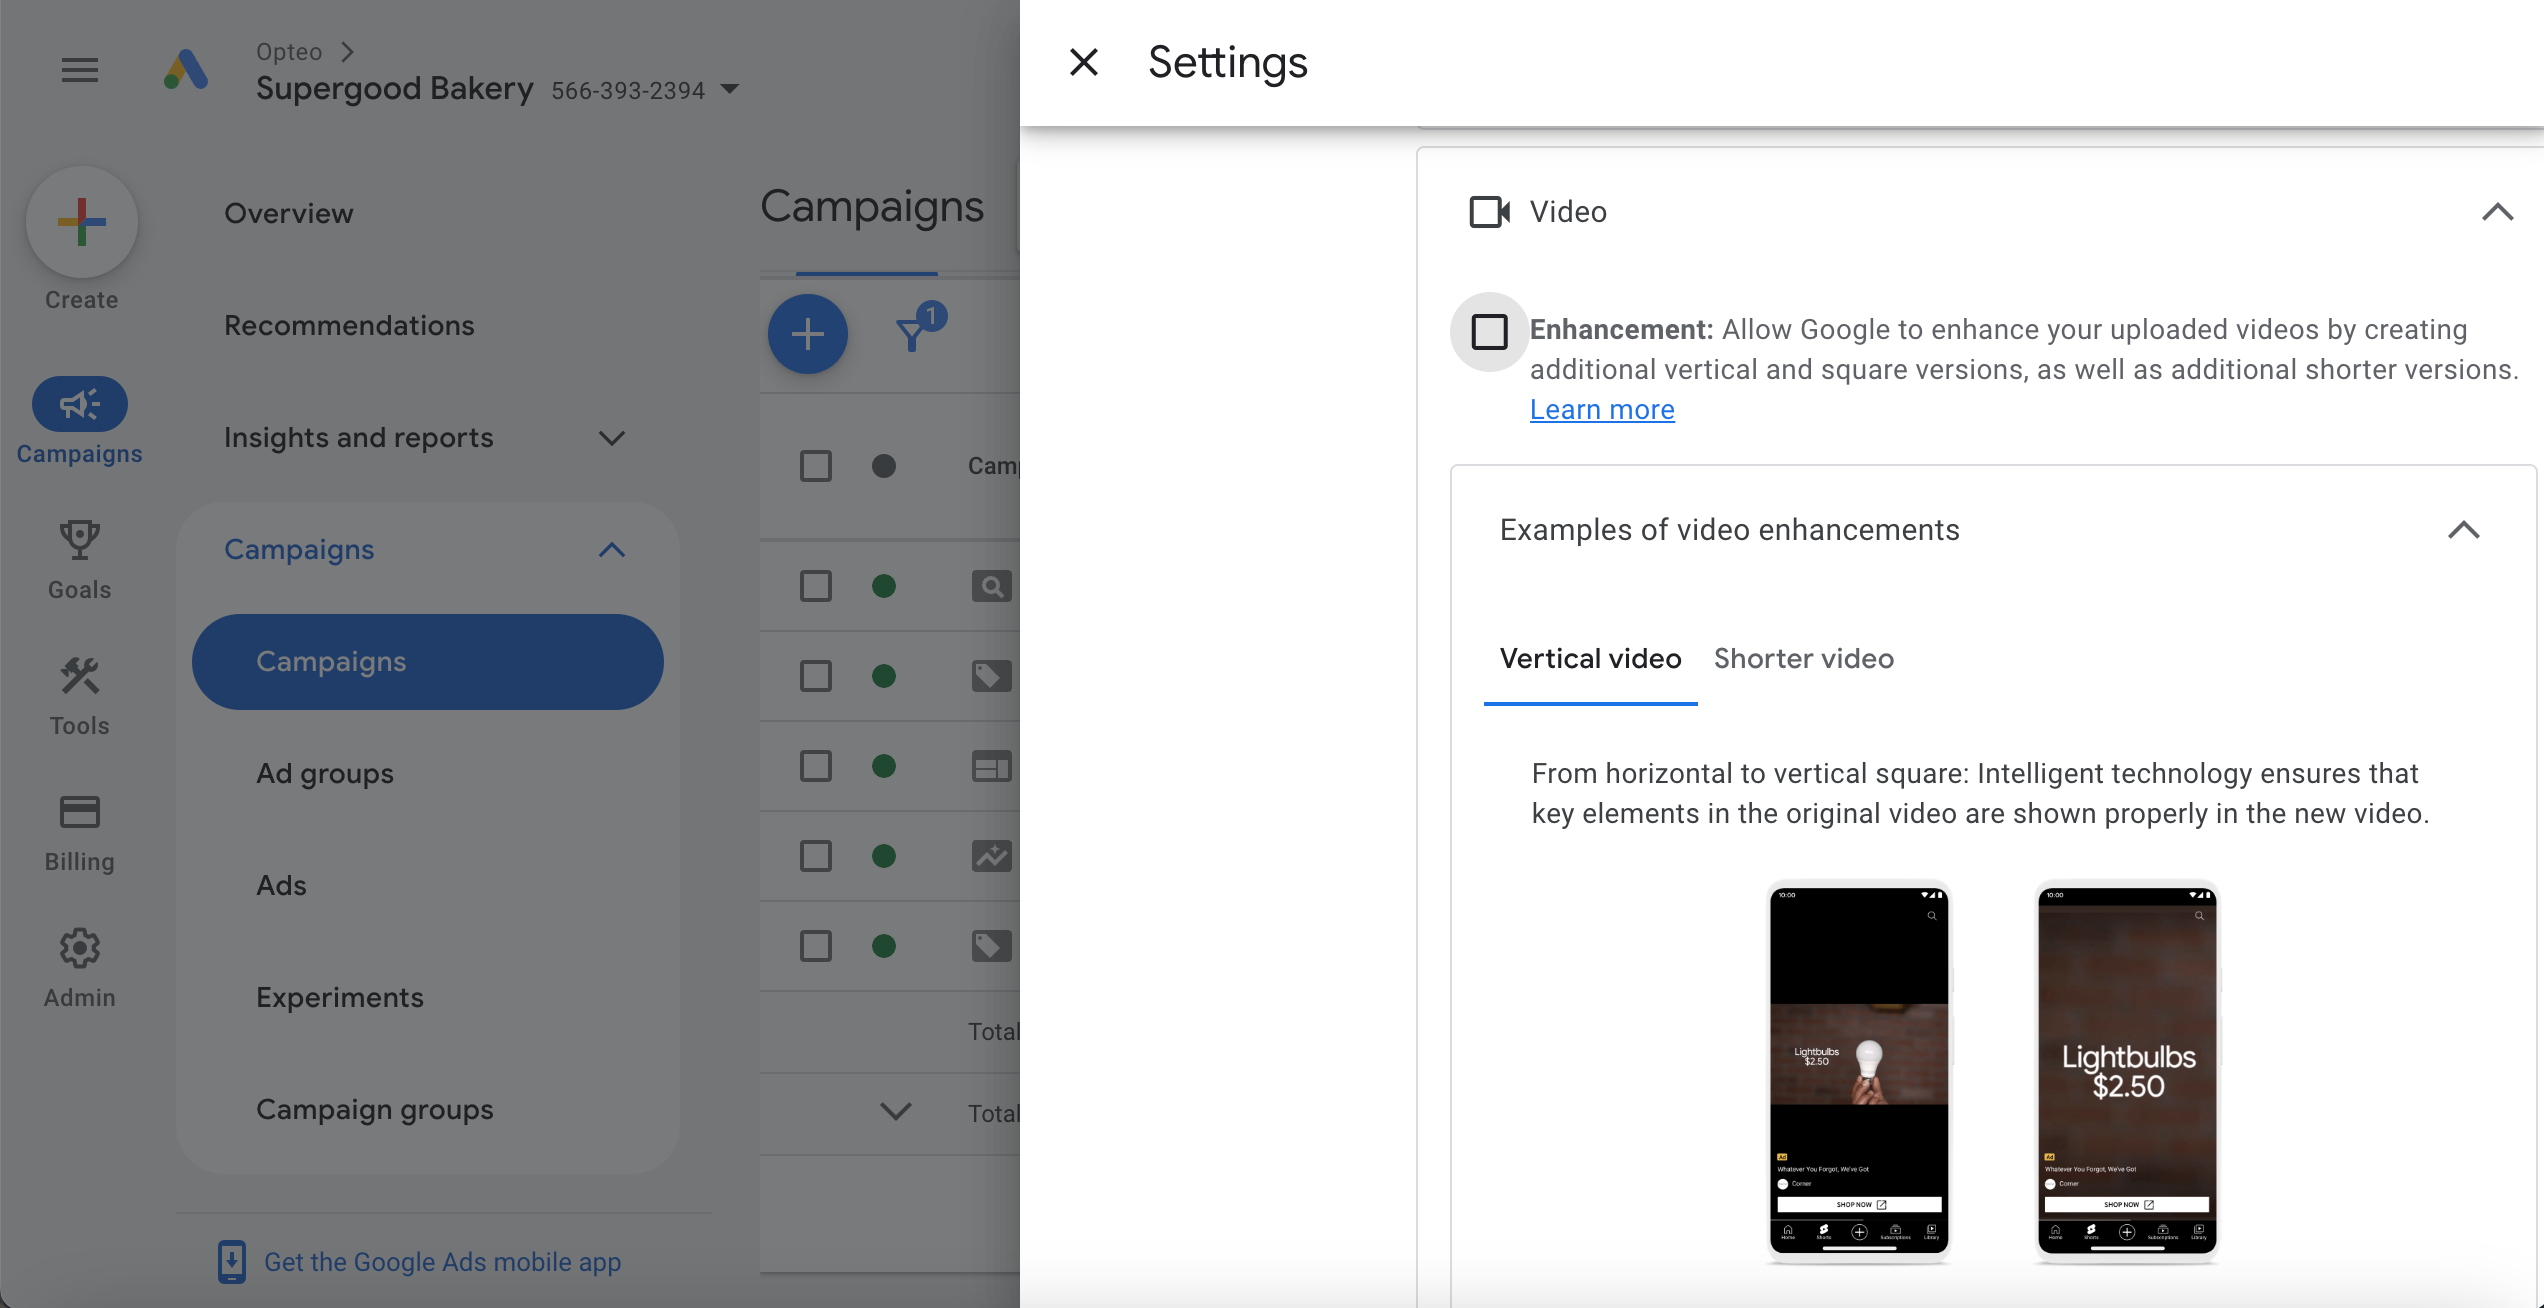 Campaign > 'settings' > 'Video' > 'Enhancement'
#Feeds
Choosing one or more feeds lets you specify which products your Pmax campaign will advertise. This is crucial if you have multiple Pmax campaigns targeting different products, such as when segmenting by performance, price points, or similar factors.
If you don’t select which feed(s) you want your campaign to use, Pmax can push any products in your account. This may be the right solution if you are running a single Pmax campaign, and don’t have any specific products you want excluded from it.
To chose which feeds you want your Pmax campaign to use, go to campaigns > 'settings' > 'feeds'.
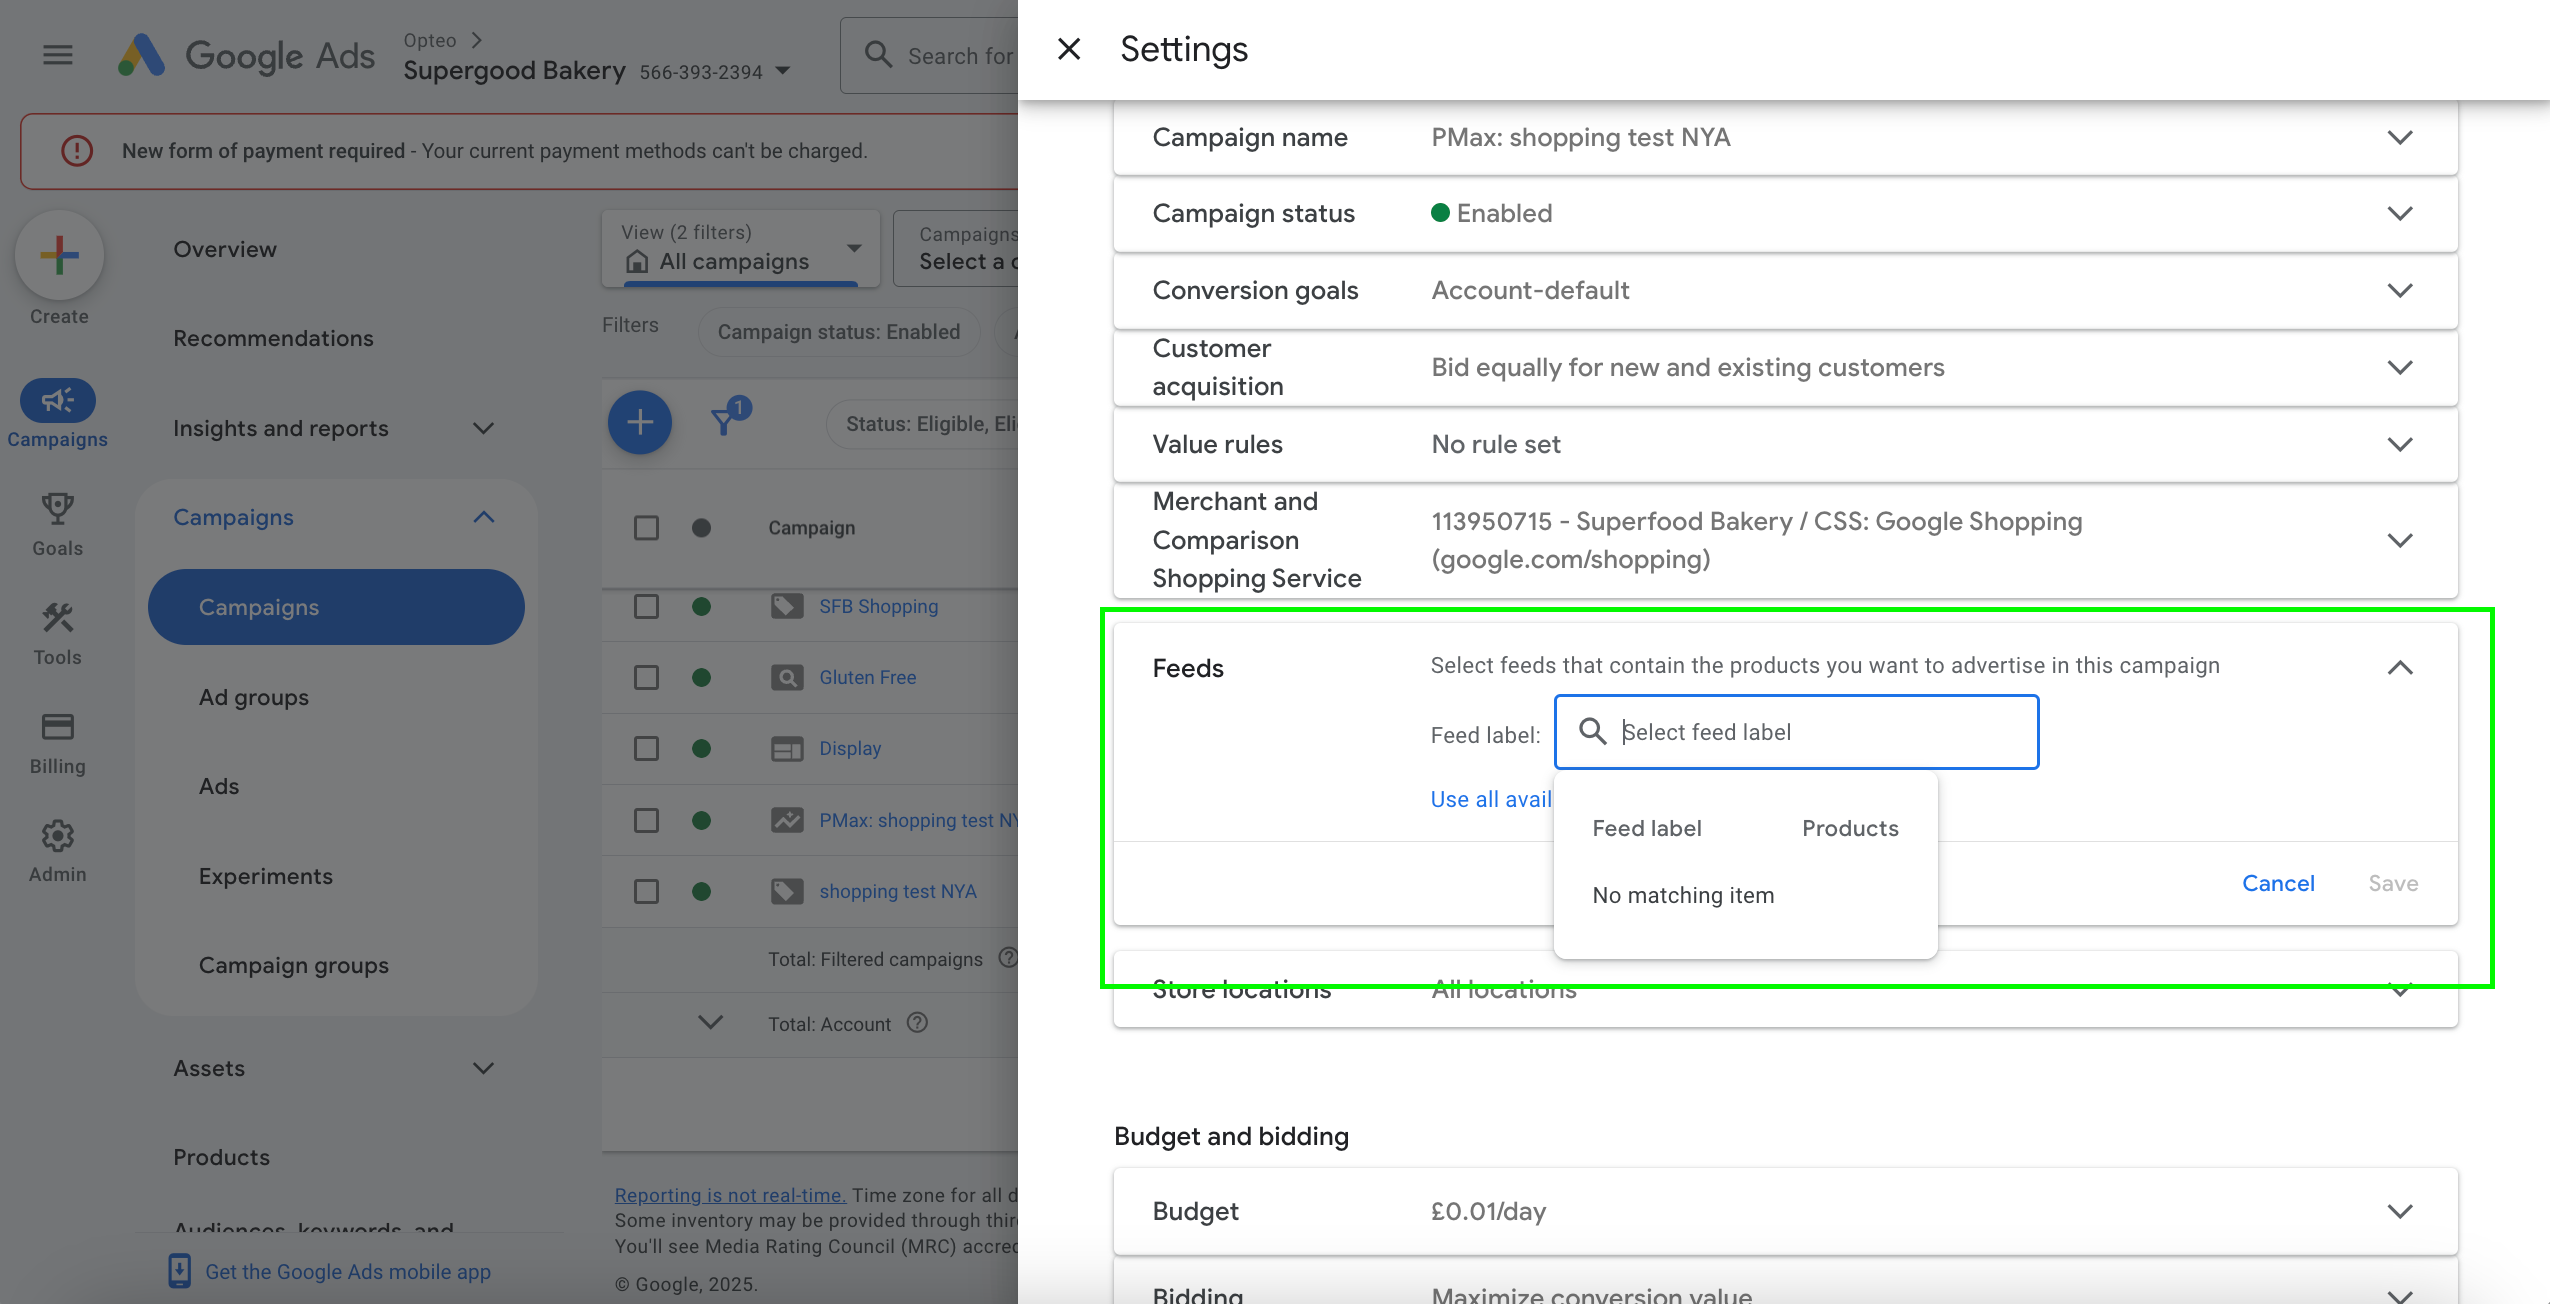 Without selecting a specific product feed, Pmax will be able to push any product in the account.